Billing Contacts Sub-Users
If you need to grant access to your server’s console or your billing account then you'll want to use a Panel Sub-User or a Billing Sub-User, respectively. In either case, the new user will have their own account with their own password and 2FA separate from yours. This allows you to grant your team access to what they need without compromising the security of your account or theirs.
As the owner of the service, you can even limit what the Game Panel Sub-Users or Billing Sub-Users can do on the respective parts of our website. This is mostly accomplished by both the Game Panel and the Client Area providing a permissions system for each individual Panel Sub-User or Billing Sub-User.
If this fits what you need, then you can find information on how to setup Billing Contacts & Billing Sub-Users below. If you need any help with the process, you can reach out to our team on Discord or in the Client Area!
You can find information on how to setup and use Game Panel Sub-Users on our ![]() GCP Sub-Users article!
GCP Sub-Users article!
Billing Sub-Users
A Billing Sub-User has access to the Client Area and as such can manage things like your Invoices, Services and Support Tickets. With the built in permissions system you can control what each user has access to, so it's easy to ensure that your team can handle their respective roles effectively.
Locating the User Management Page
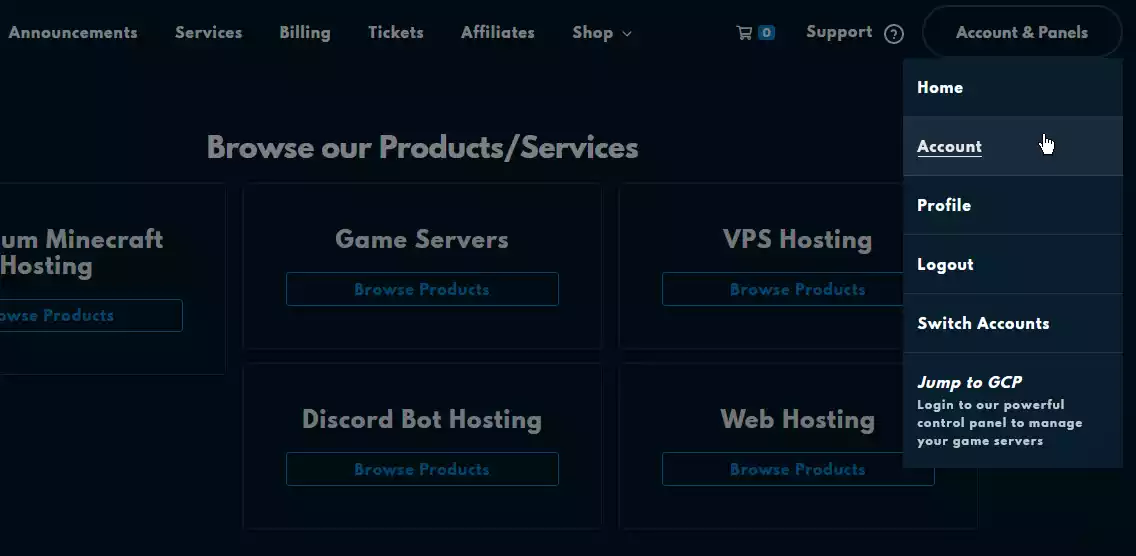
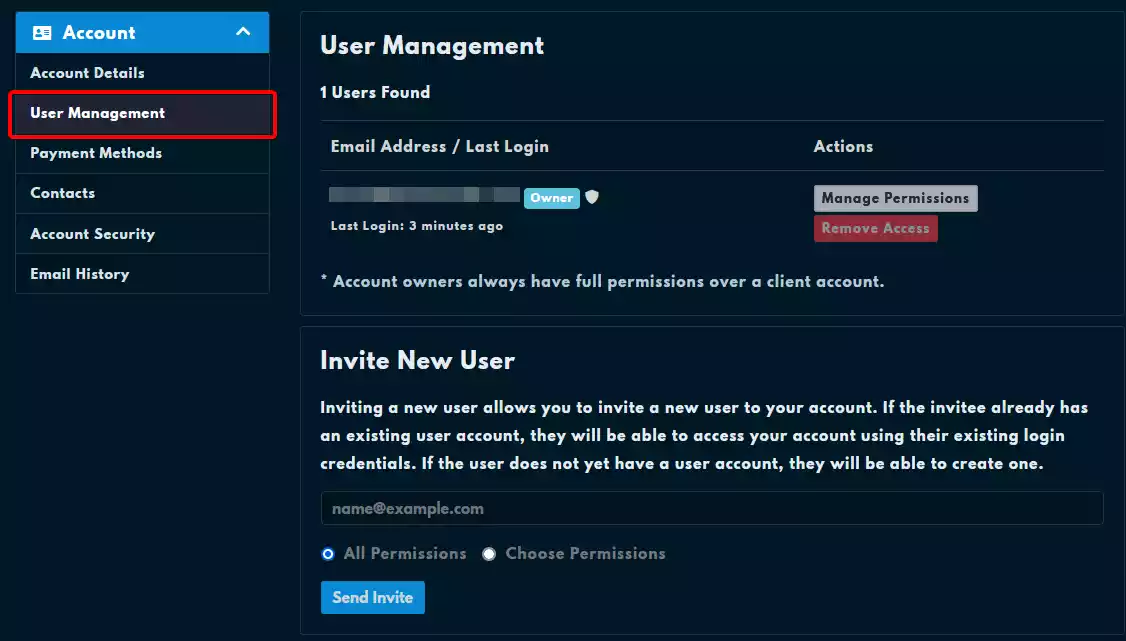
You can add a new Billing Sub-User to your Billing Account by navigating to the Client Area, clicking on the Account & Panels on the right of the navigation bar, selecting Account, then selecting User Management from the sidebar on the left, as seen in the images below.
 Loading...
 Loading...
Adding a new Billing Sub-User
You can invite a new user to be a Billing Sub-User for your Billing Account by entering their email address into the Invite New User box on the User Management page. By entering their email address and sending an invite, you’ll be sending them an email notifying them and giving them the option to accept the invite or ignore it.
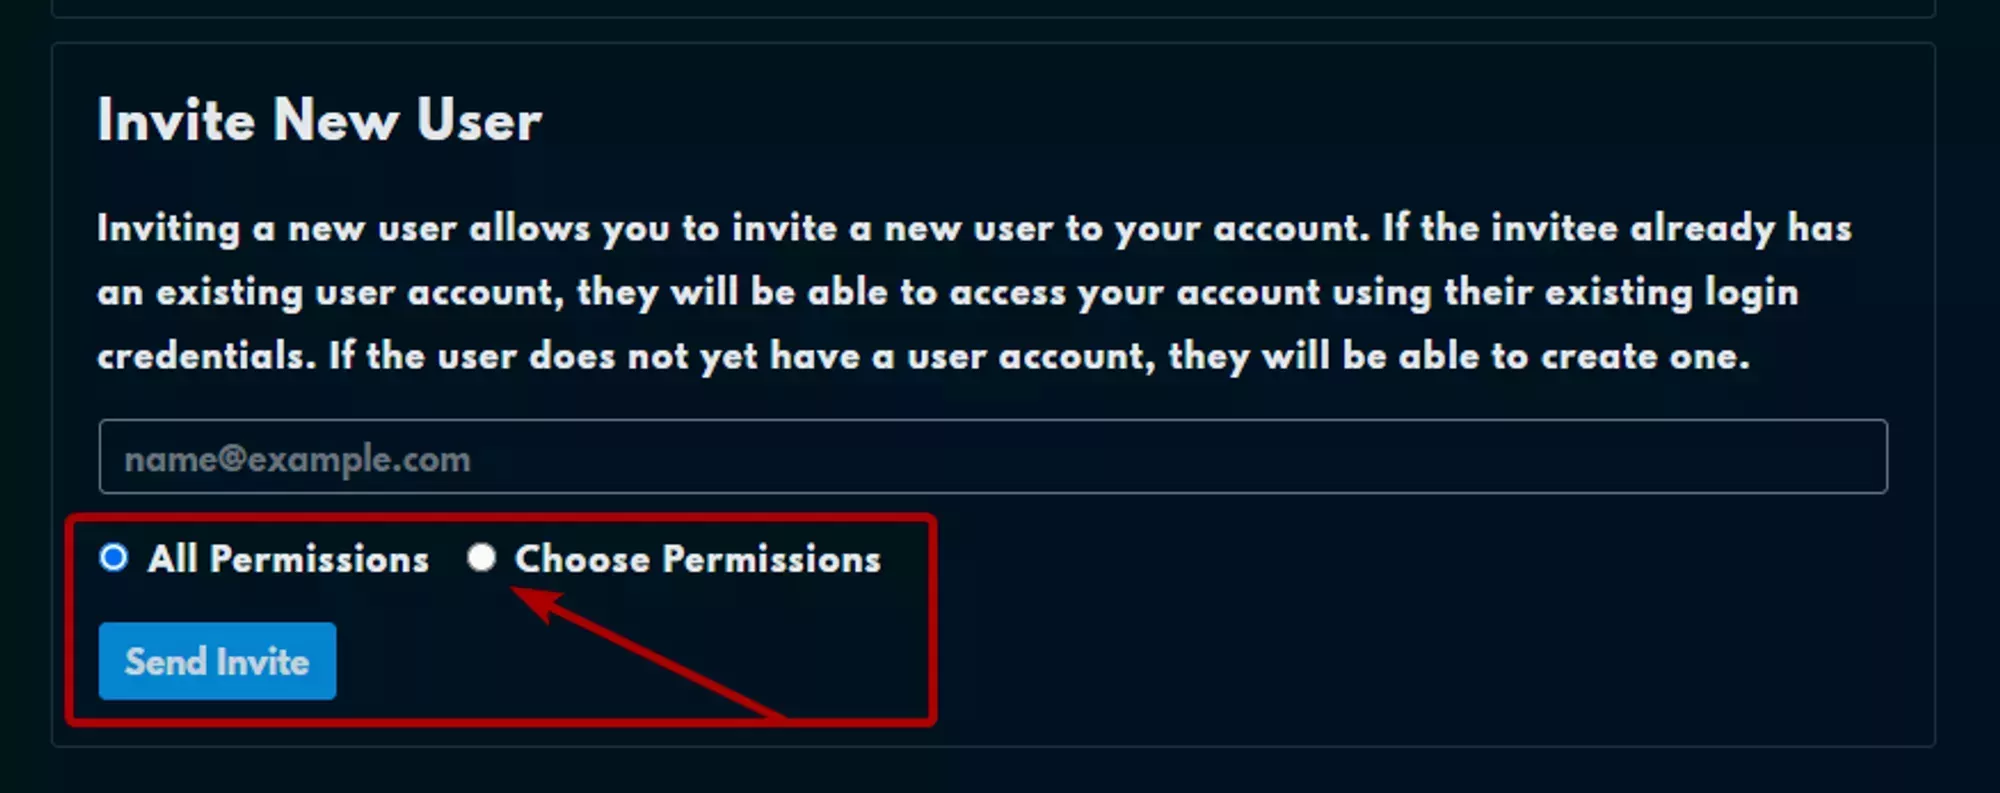
Before sending the invite you also have the option to grant them every permission available for a Billing Sub-User, or specifically select the permissions you want by selecting the Choose Permissions radio button instead of the All Permissions radio button as demonstrated in the image below..
Before sending the invite we recommend checking out what each permission does! We have a section on the permissions here!
 Loading...
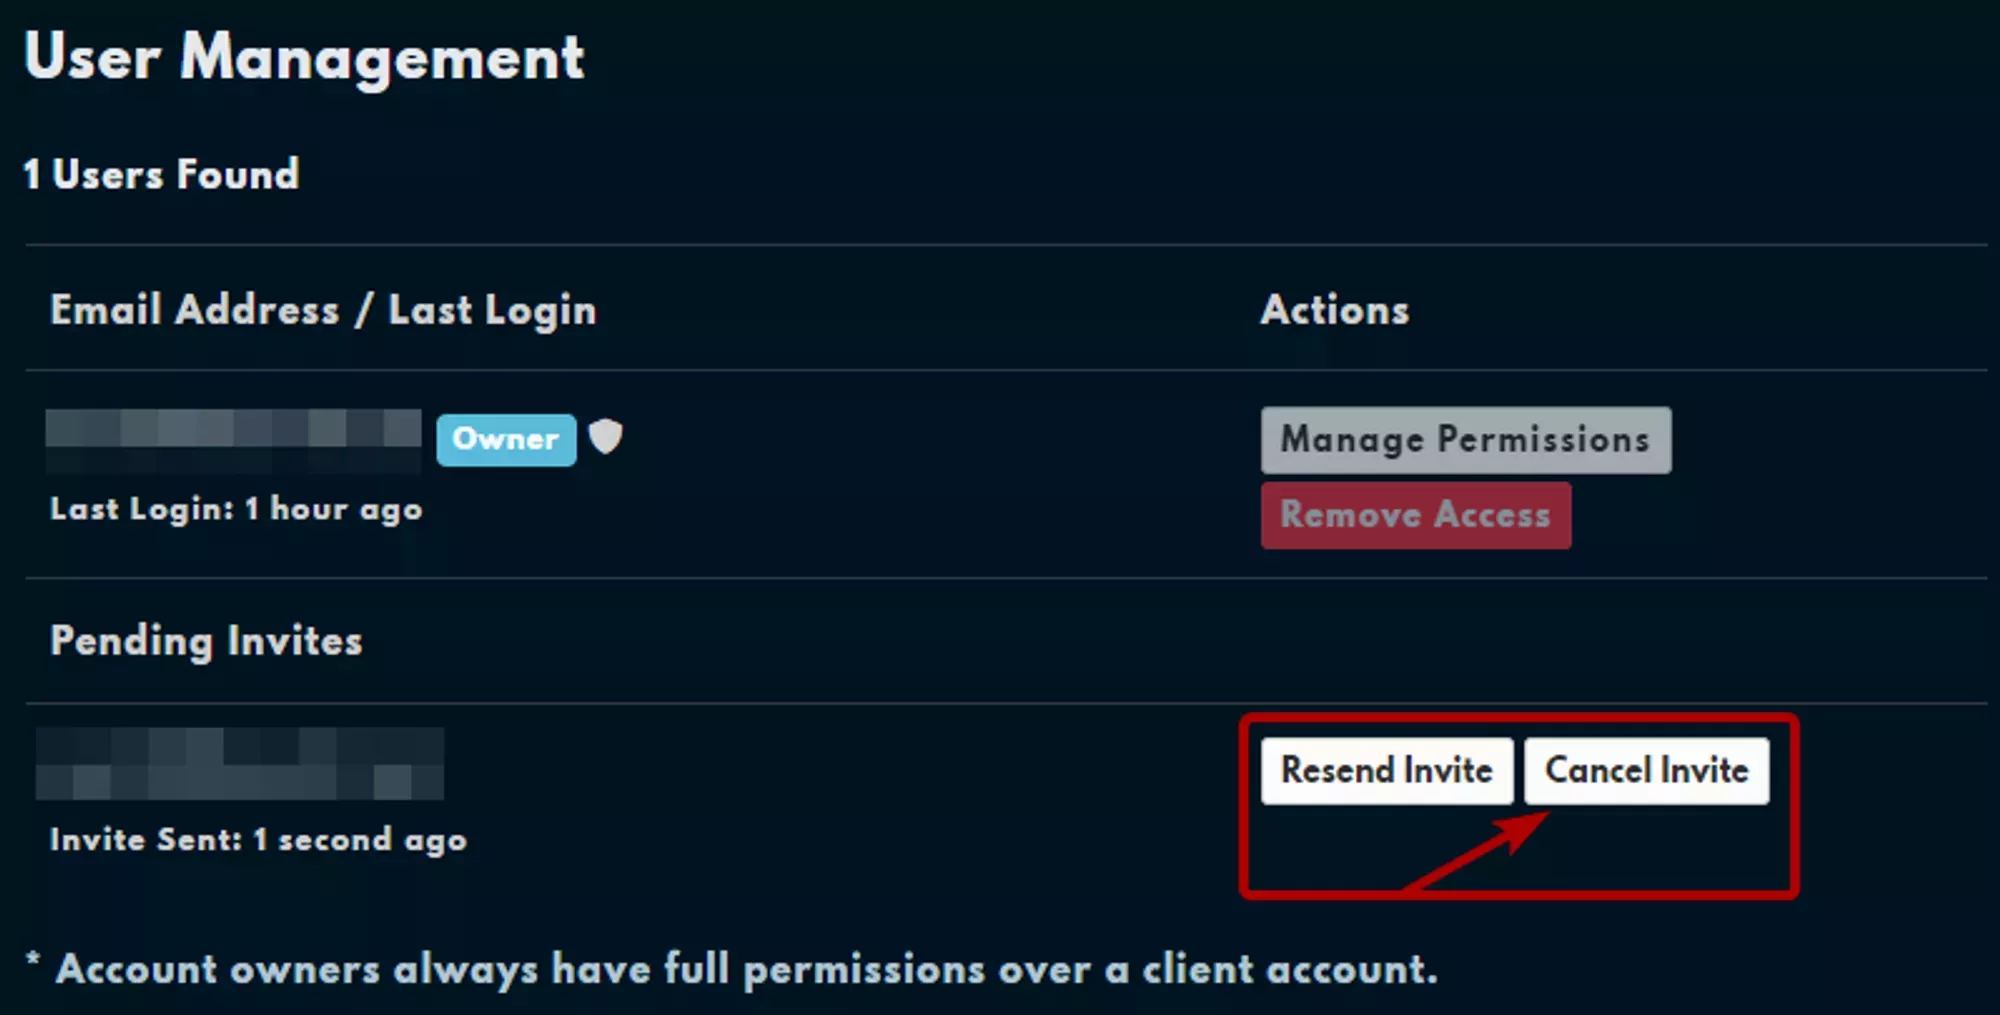
You can cancel an invite before the user accepts it by navigating to the User Management page and clicking cancel invite.
 Loading...
Billing Sub-User Verification
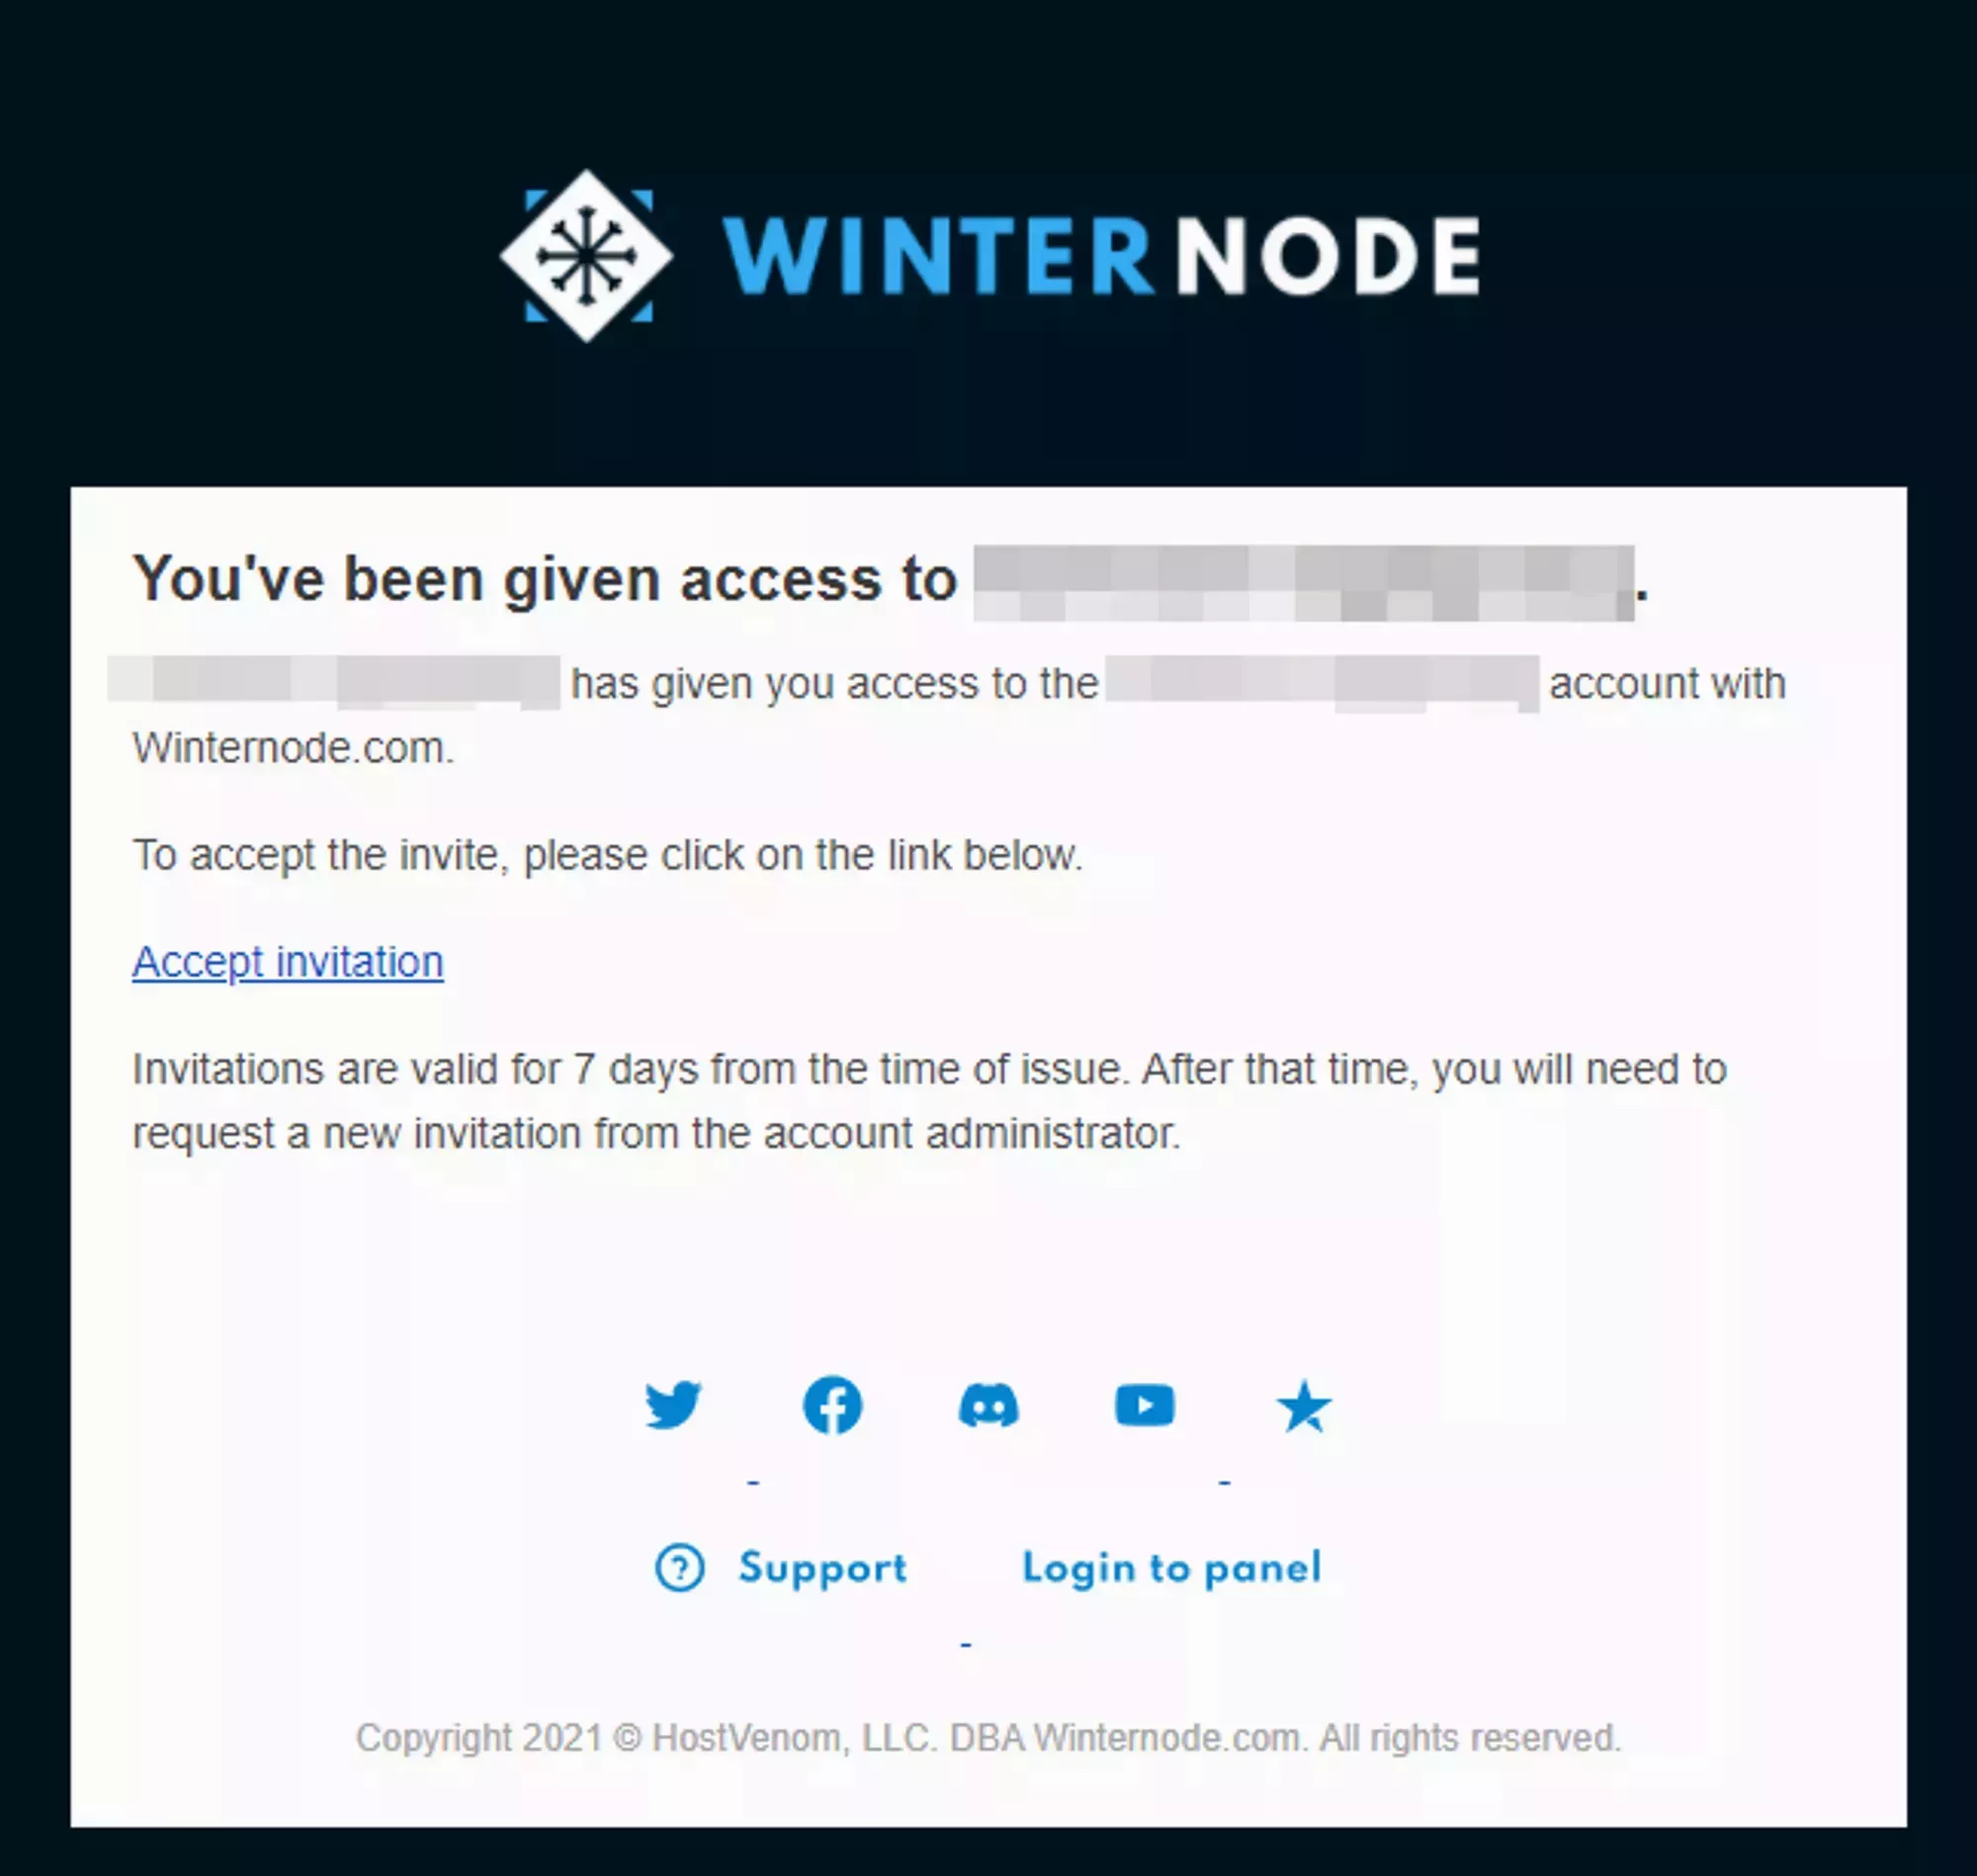
When you invite a new Billing Sub-User they will receive an email that looks similar to the example shown to the right and will have 7 days to accept the invite. If they choose not to accept your invite then the link included in the email will expire and they won’t have any access to your Billing Account.
The email will come from [email protected].
If they didn’t receive the email for whatever reason, you can resend the the invite from the User Management page by clicking on the Resend Invite button under the Pending Invites header as noted in the image to the right.
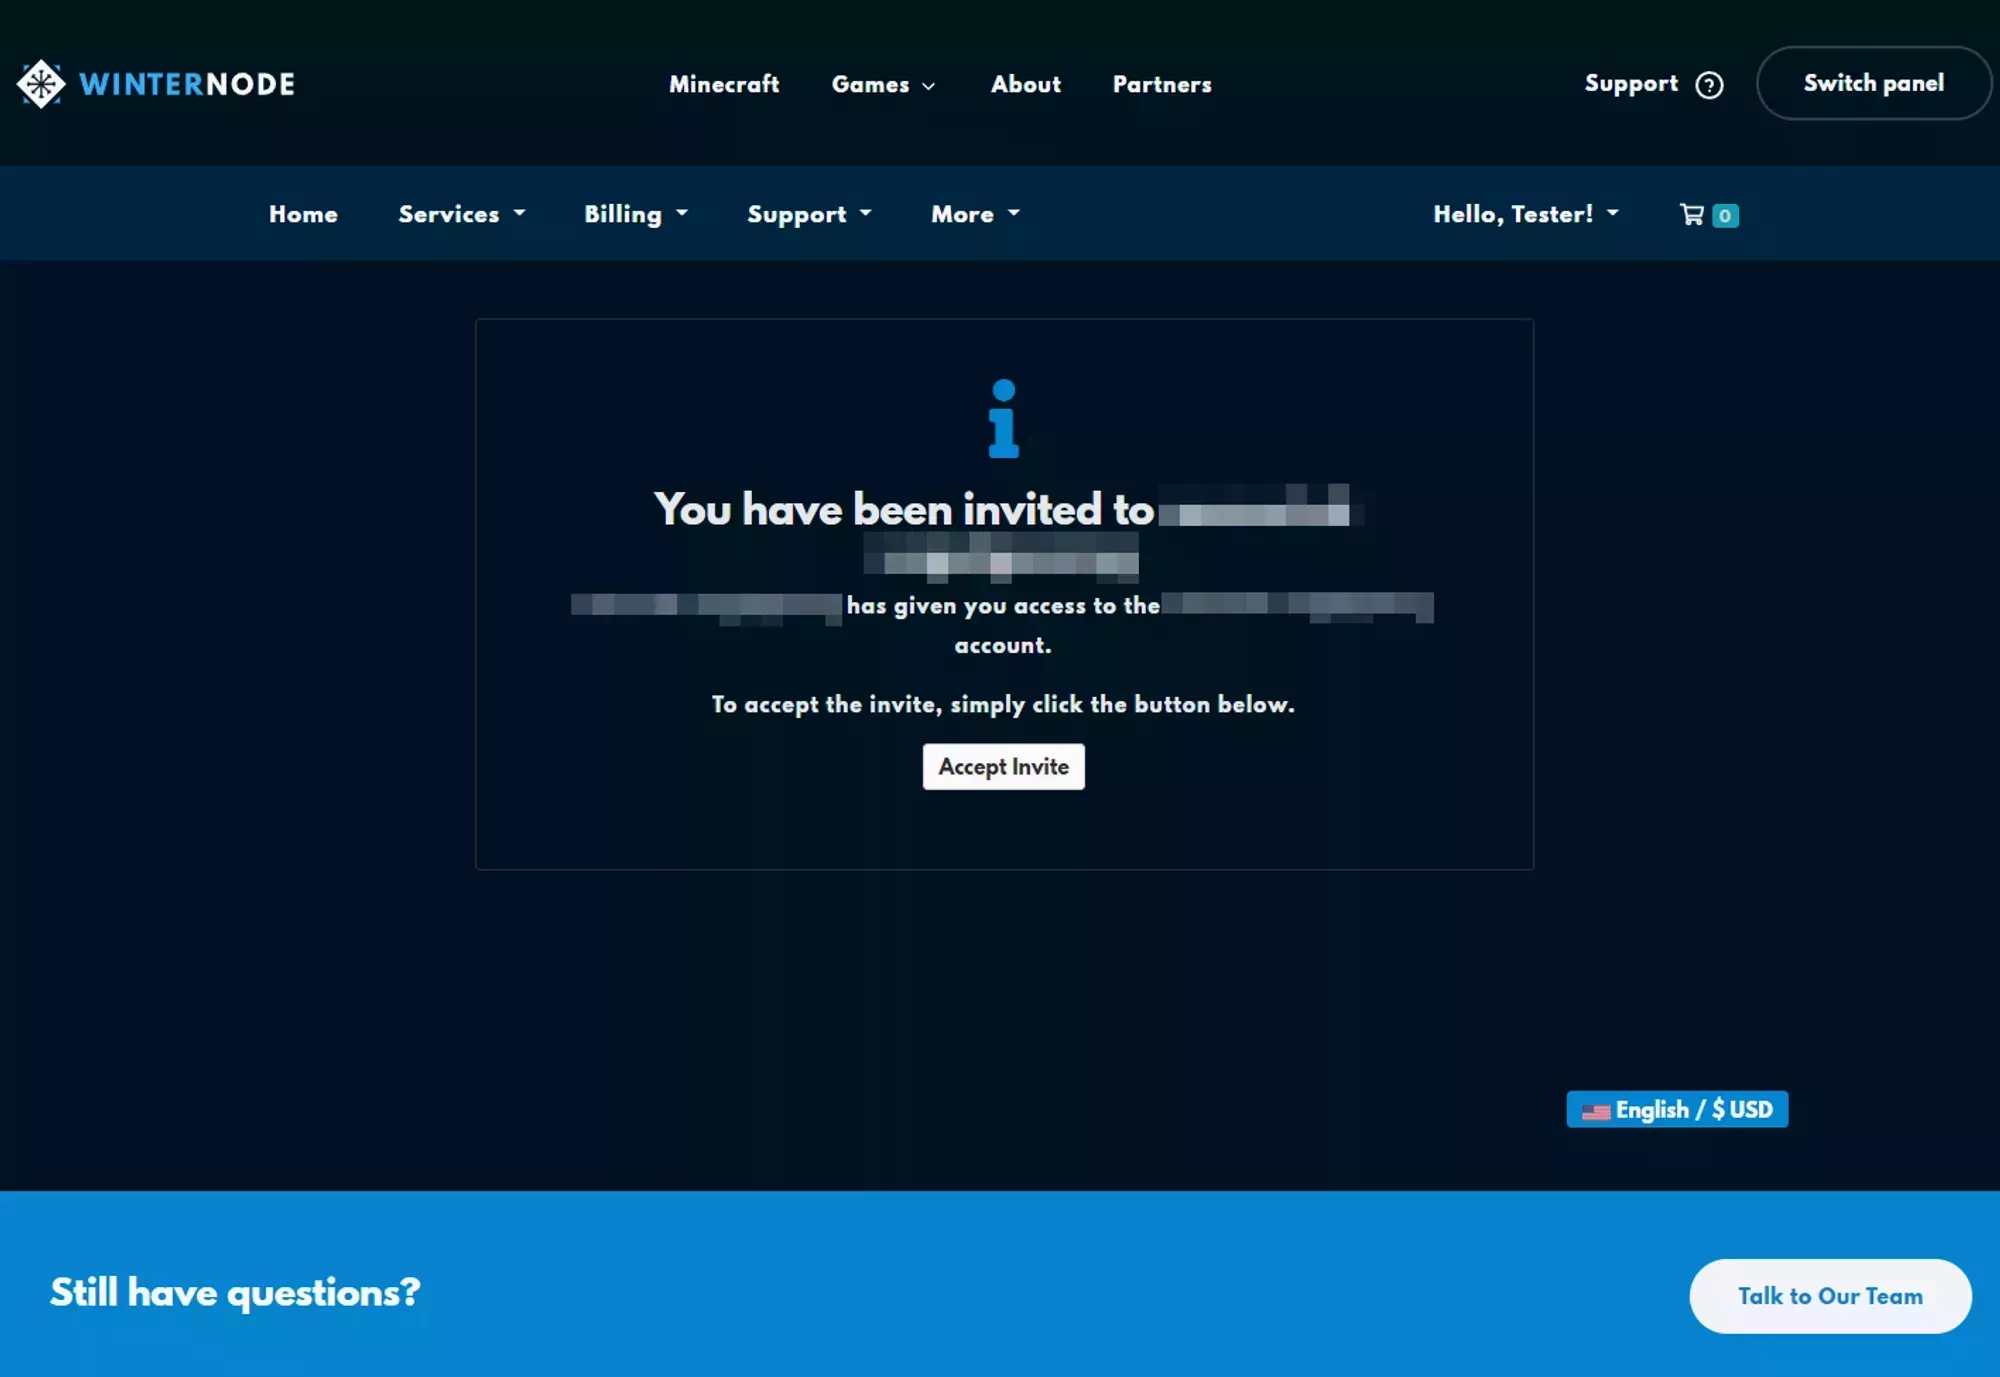
After clicking on the accept invitation link, the Billing Sub-User will see a page similar to the one shown on the right and after accepting the invite from this page they will have access to your Billing Account with the permissions you assigned to them.
 Loading...
Loading...
Loading...
 Loading...
Removing an existing Billing Sub-User
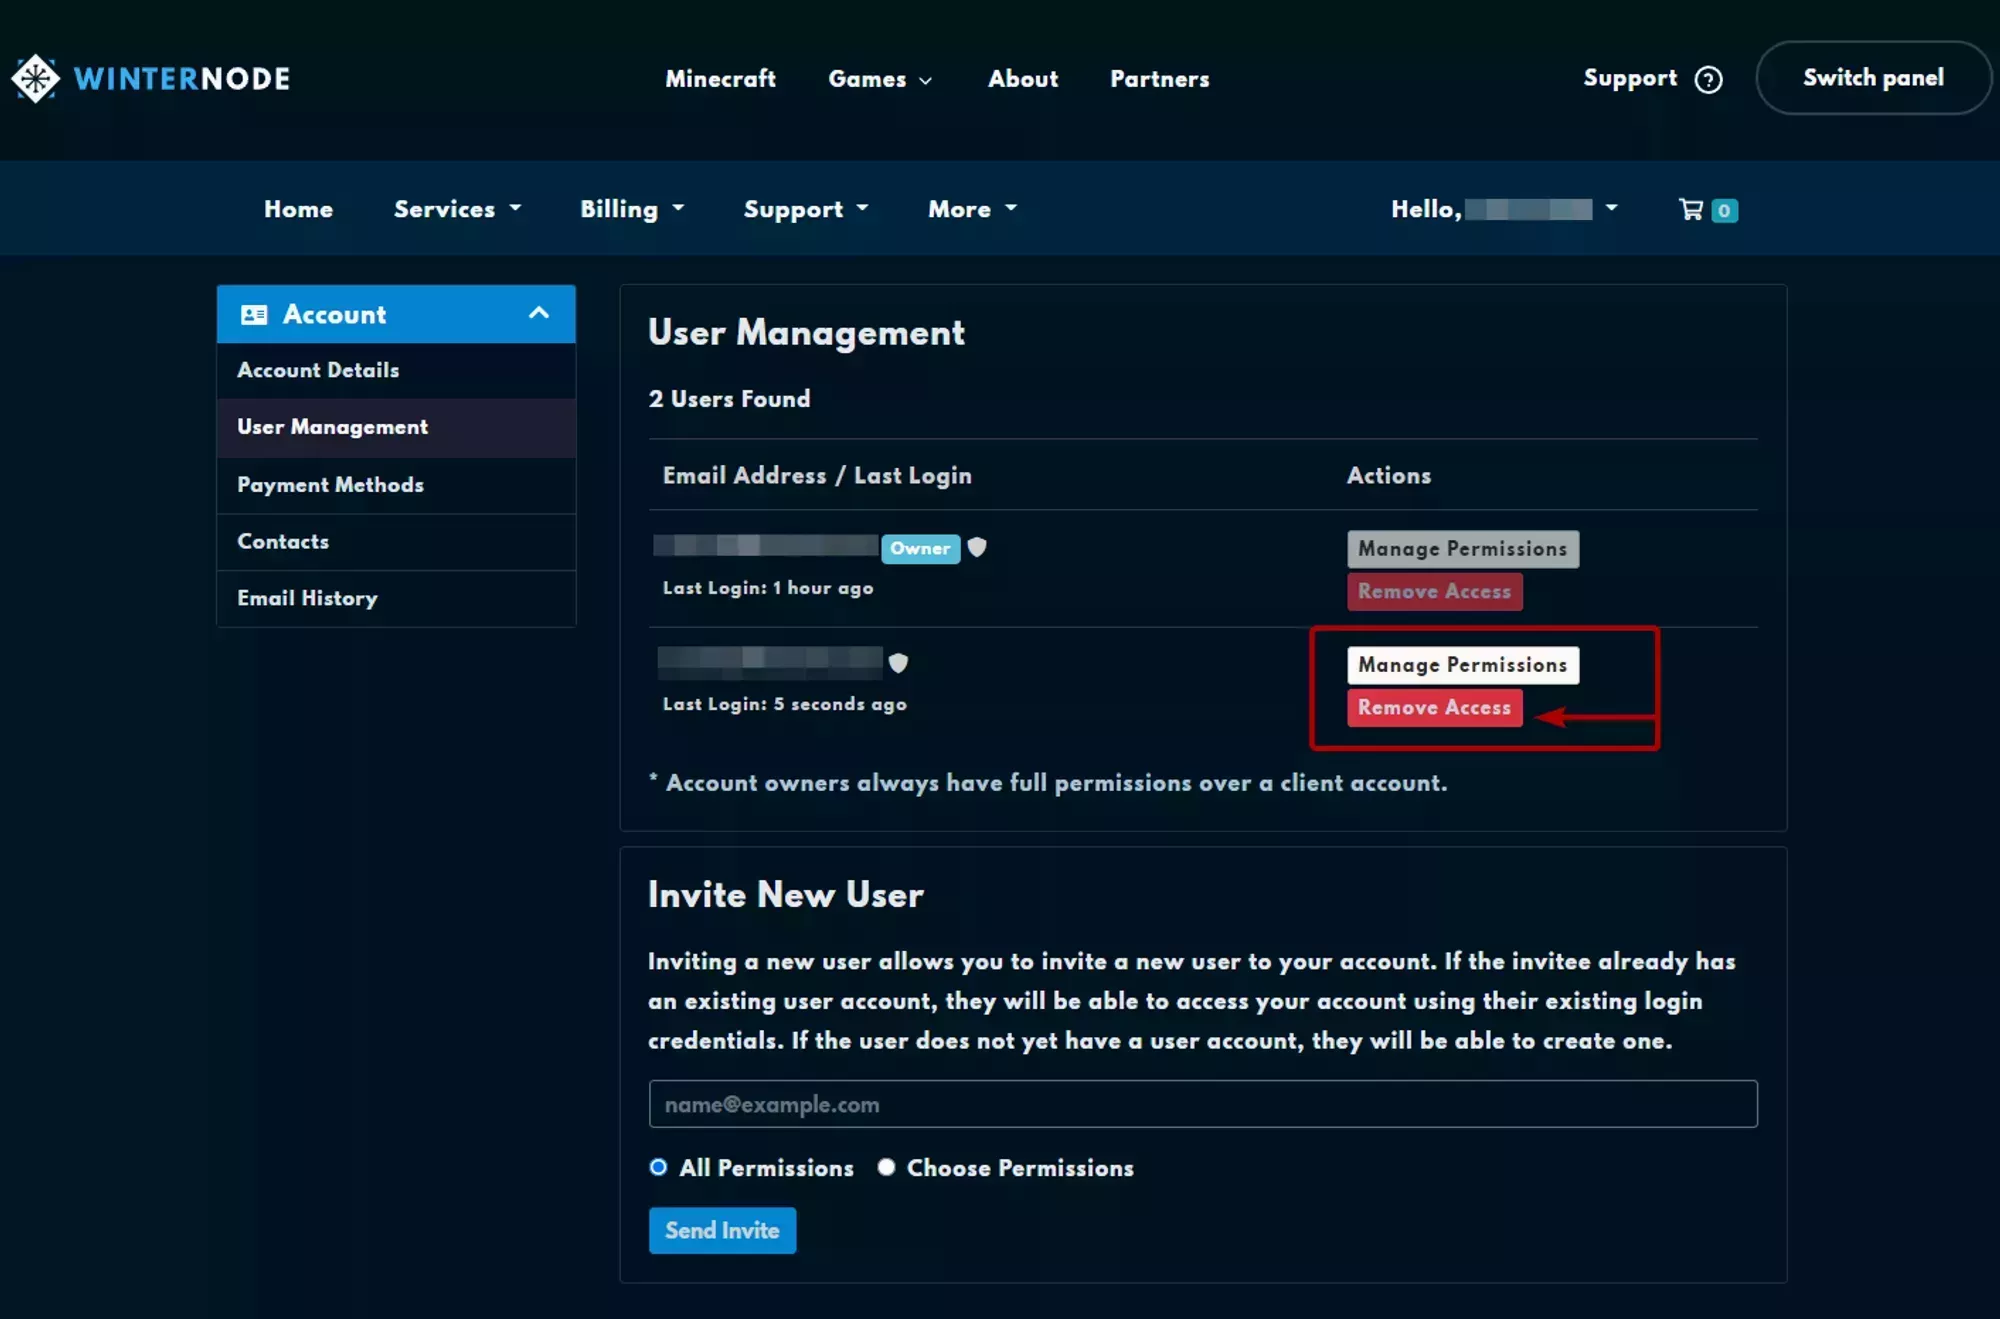
To remove an existing Billing Sub-User navigate to the User Management page and click on the Remove Access button and then confirm your choice in the confirmation popup. This will permanently remove this Billing Sub-User from your Billing account unless you re-invite them.
 Loading...
Securing a Billing Sub-User Account
Billing Sub-Users use separate authentication methods than the primary account, which is it’s own protection against unwanted actions taking place on your service, but to take full advantage of the protection of a Sub-User you’ll want to make sure you enable 2-Factor Authentication for the Sub-User and grant them only the Permissions they need.
Permissions
You can limit what a Billing Sub-User can do either when you send the invite or after by selecting specific permissions from a list. We go over the list of permissions, what they do, and their limitations below, as well as where you can modify the Billing Accounts Sub-User's permissions.
Before the invite
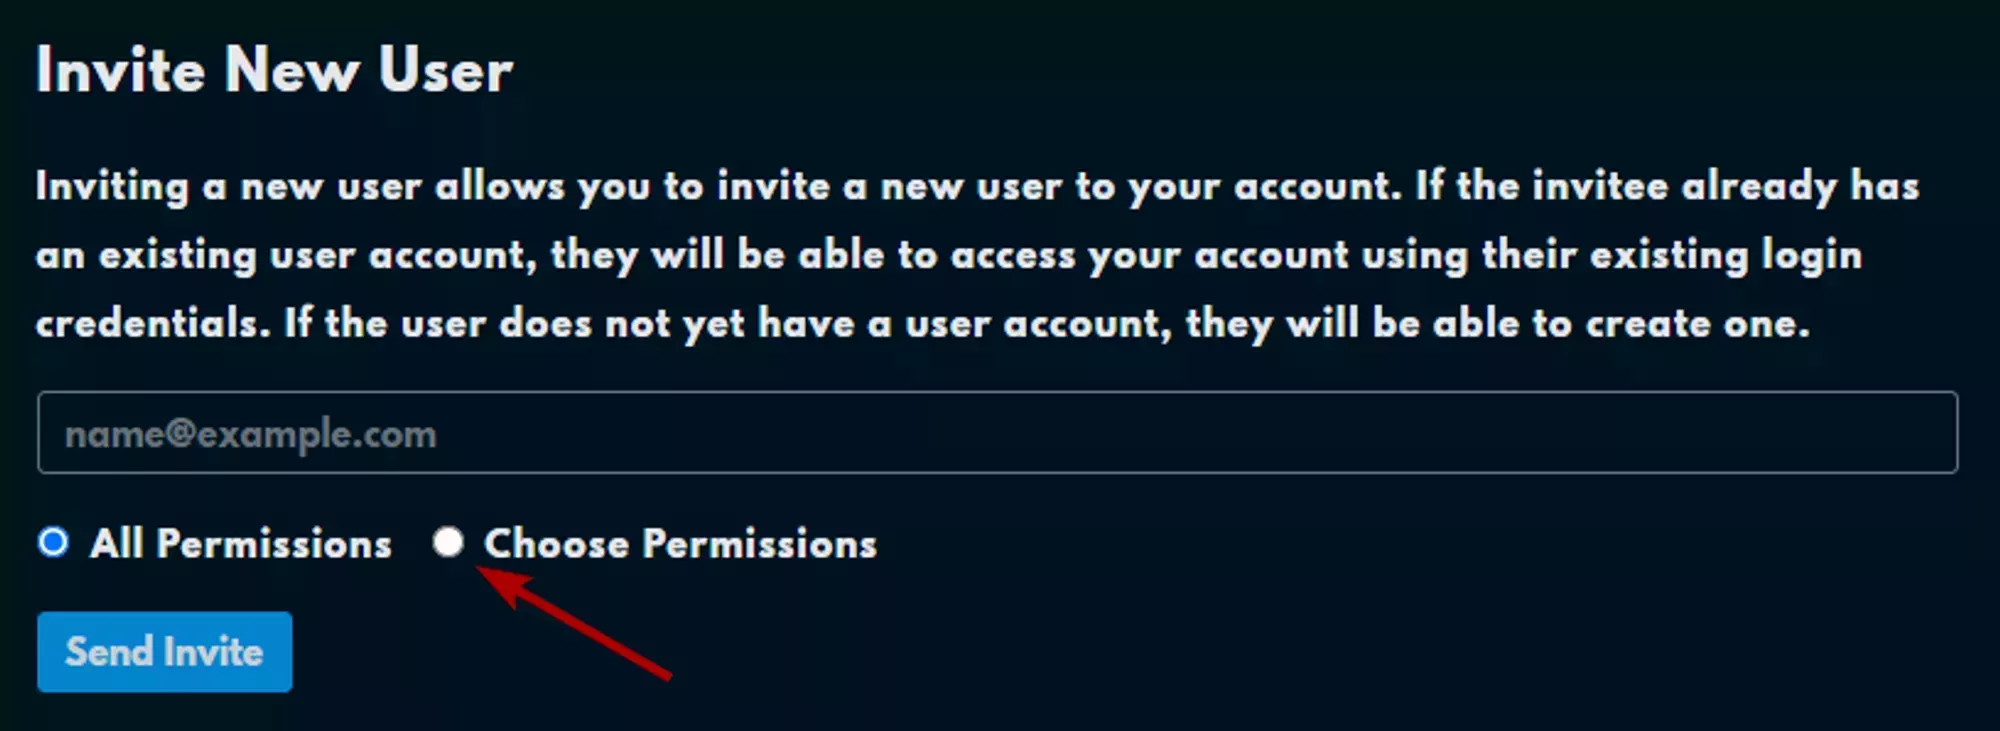
You can select the permissions a Billing Sub-User before you invite them by selecting the Choose Permisions radio button under the email input as shown in the image below.
 Loading...
After Invite Acceptance
You can manage the permissions of an existing Billing Sub-User by navigating to the User Management page and selecting the Manage Permissions button next to the user you want to edit as shown in the image below.
 Loading...
Permissions List
This is a list of all of the permissions provided by the panel, brief descriptions of them, and whether or not their relevant to services provided by WinterNode.
Modify Master Account Profile
Access and modify the client profile information
Ability to access, view, and modify the Account Details for the primary client client profile that invited the Billing Sub-User.
View & manage Contacts
Access and manage contacts
Ability to View and Manage all details of ![]() Billing Contacts.
Billing Contacts.
View Products & Services
View access to products, services and addons
Ability to view all products, services, and addons currently purchased.
View & Modify Product Passwords
Allow password resets and other actions
Ability to reset passwords for all products.
Perform Single Sign-On
Allow single sign-on into services
This permission is currently unsupported. Please use Game Panel Sub-Users to add users to the Game Panel.
View Domains
View access to domain registrations
This permission is currently unsupported as WinterNode does not sell or register domains.
Manage Domain Settings
Allow domain management eg. nameservers/whois/transfers
This permission is currently unsupported as WinterNode does not sell or register domains.
View & Pay Invoices
View and payment access to invoices
Ability to view all current and past invoices and pay outstanding ones.
View & Open Support Tickets
Access to open, respond and manage support tickets
Ability to open, view, and respond to, support tickets under Support -> Tickets.
View & Manage Affiliate Affiliate Account
Access to view and request withdrawals
This permission is currently unsupported. We manage our partners as with a separate system ❤
View Emails
Access to view account email history
Ability to view email history by selecting Email History from the Account side bar on the Account page (Shown in the Images below).
Loading...
 Loading...
Place New Orders/Upgrades/Cancellations
Allow placing of new orders
Ability to place new orders for products or services on the Billing Account using the payment methods on the account.
2-Factor Authentication
2-Factor Authentication is an extra step added to logging into an account that helps prevent unauthorized access. If your Sub-User has enabled 2-Factor Authentication, or 2FA, then they’ll be required to provide a token provided by an Authenticator application when they log into their account. The token is cryptographically generated from a private code only shared between WinterNode and their Authenticator application. The goal of this is to provide a second authentication requirement for accessing their account, in particular one that is tied to a physical device like their cell phone. As long as they don’t share the 2FA tokens, the code provided by the service to enable 2FA, and a third party doesn’t have physical access to the device that they're using for their Authenticator application, this is a nearly foolproof method of authenticating. For redundancies sake, they can even save the original code, often shown in-tandem with a 2D QR code, in a password manager or other safe location, in case they lose your device or want to have multiple devices set up with an Authenticator application ready to go.
They'll need to follow the steps outlined below in order to enable 2FA on their own Client Area account. There's currently no way for you to verify or enforce that they enable 2FA.
2-Factor Authentication is an extra step added to logging into an account that helps prevent unauthorized access. If you've enabled 2-Factor Authentication, or 2FA, then you’ll be required to provide a token provided by an Authenticator application when you log into your account. The token is cryptographically generated from a private code only shared between WinterNode and the Authenticator application. The goal of this is to provide a second authentication requirement for accessing your account, in particular one that is tied to a physical device like your cell phone. As long as you don’t share the 2FA tokens, the code provided by the service to enable 2FA, and a third party doesn’t have physical access to the device that you’re using for your Authenticator application, this is a nearly foolproof method of authenticating. For redundancies sake, you can even save the original code, often shown in-tandem with a 2D QR code, in a password manager or other safe location, in case you lose your device or have multiple devices set up with an Authenticator application ready to go.
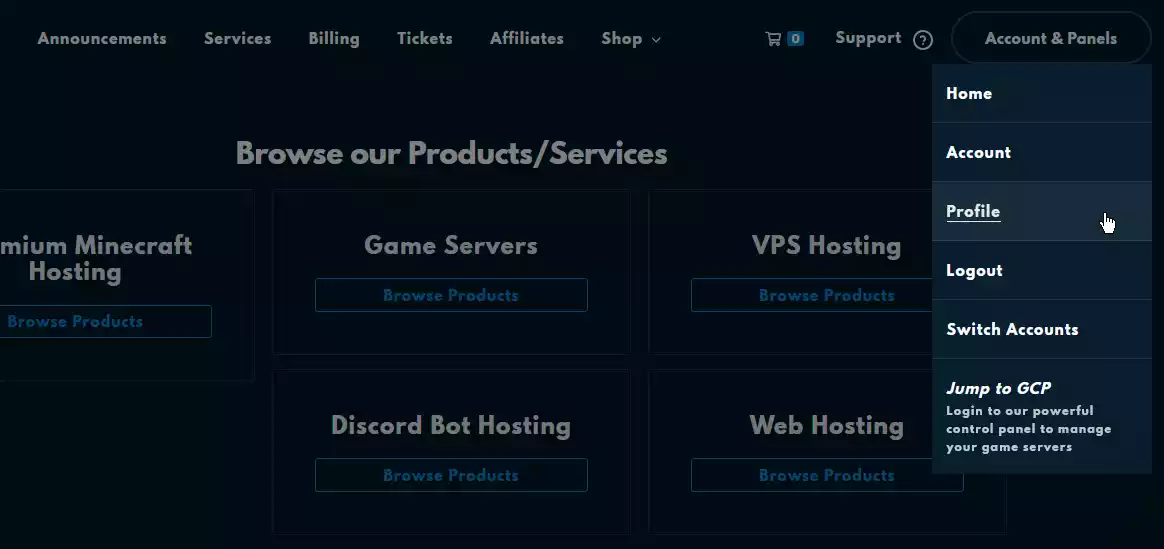
You can find the 2-FA setting in the User Greeting dropdown by clicking on the Hello <User>! greeting on the right side of the navbar, after logging into the ![]() Client Area, and then selecting
Client Area, and then selecting Security Settings, as seen in the image to the right.
 Loading...
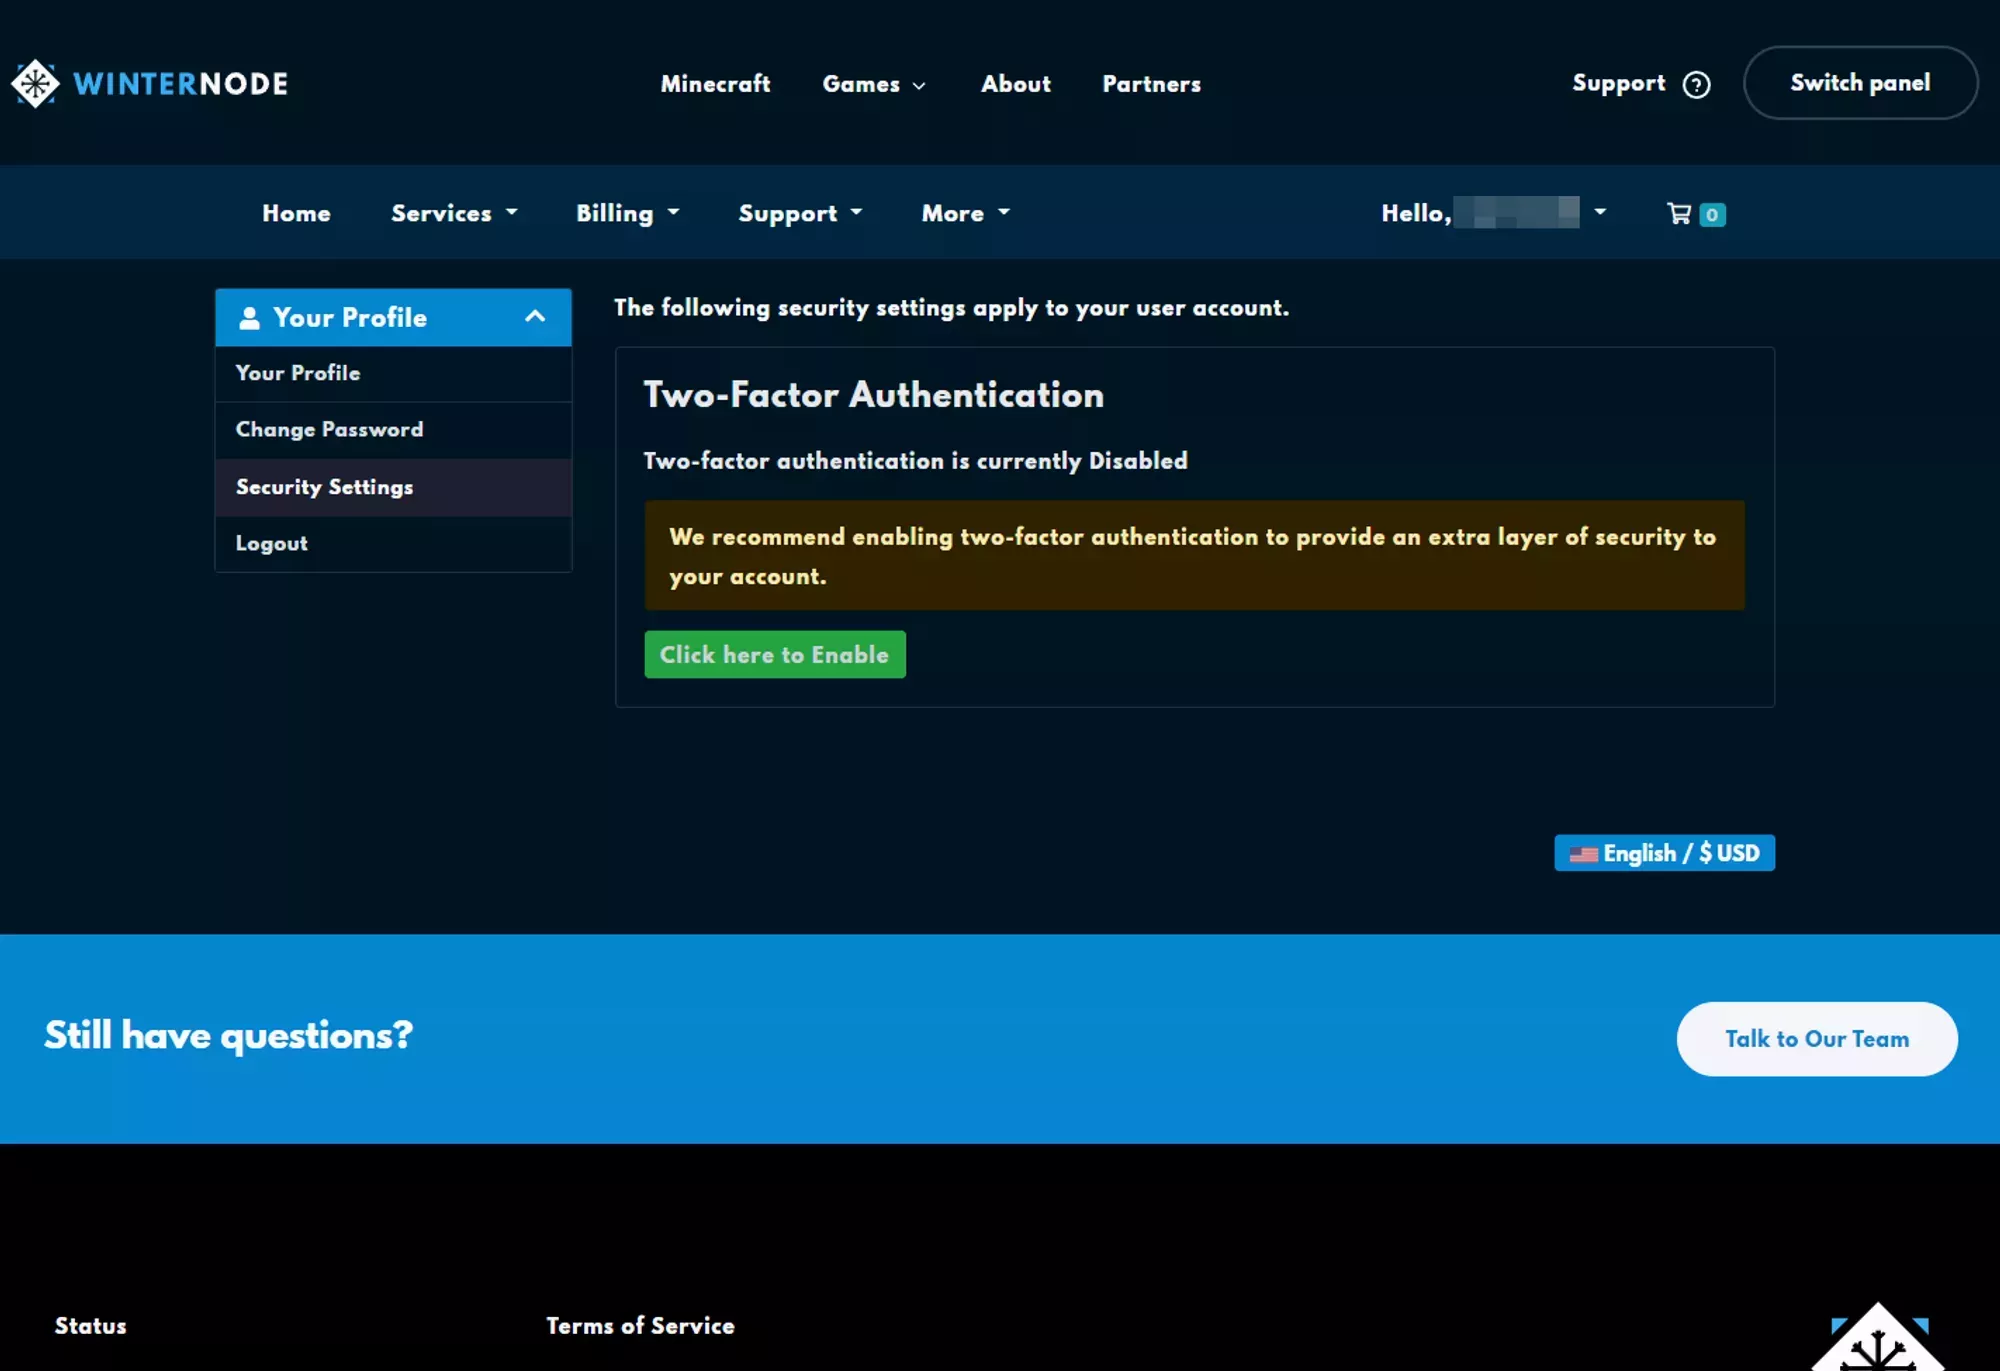
Once there, you’ll find a sidebar on the left side of the page that contains an entry titled Security Settings and on that page will be the Two-Factor Authentication section.
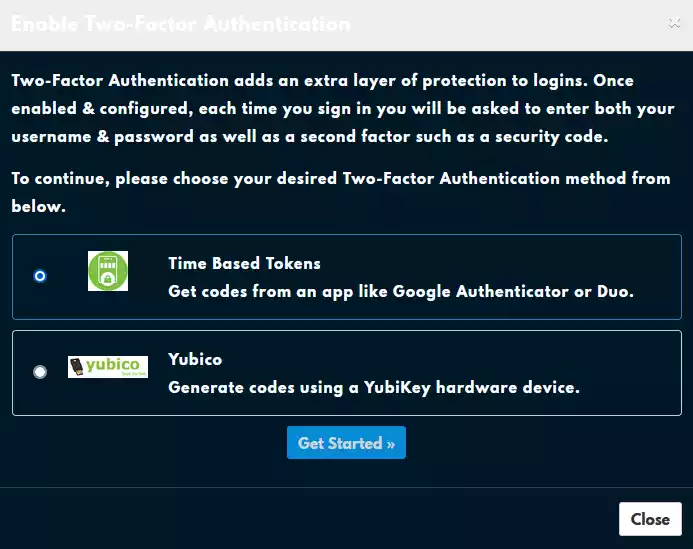
Next, click the green Click here to Enable button and you’ll get a popup matching the one shown in the image below. You'll be presented with two options, "Time Based Tokens", which is what we've covered so far, and "Yubikey, which is an entirely different kind of 2FA that requires a specialized device. We'll be continuing to use the "Time Based Tokens" option, which is selected by default, so you can click Get Started button and continue with the steps below.
 Loading...
 Loading...
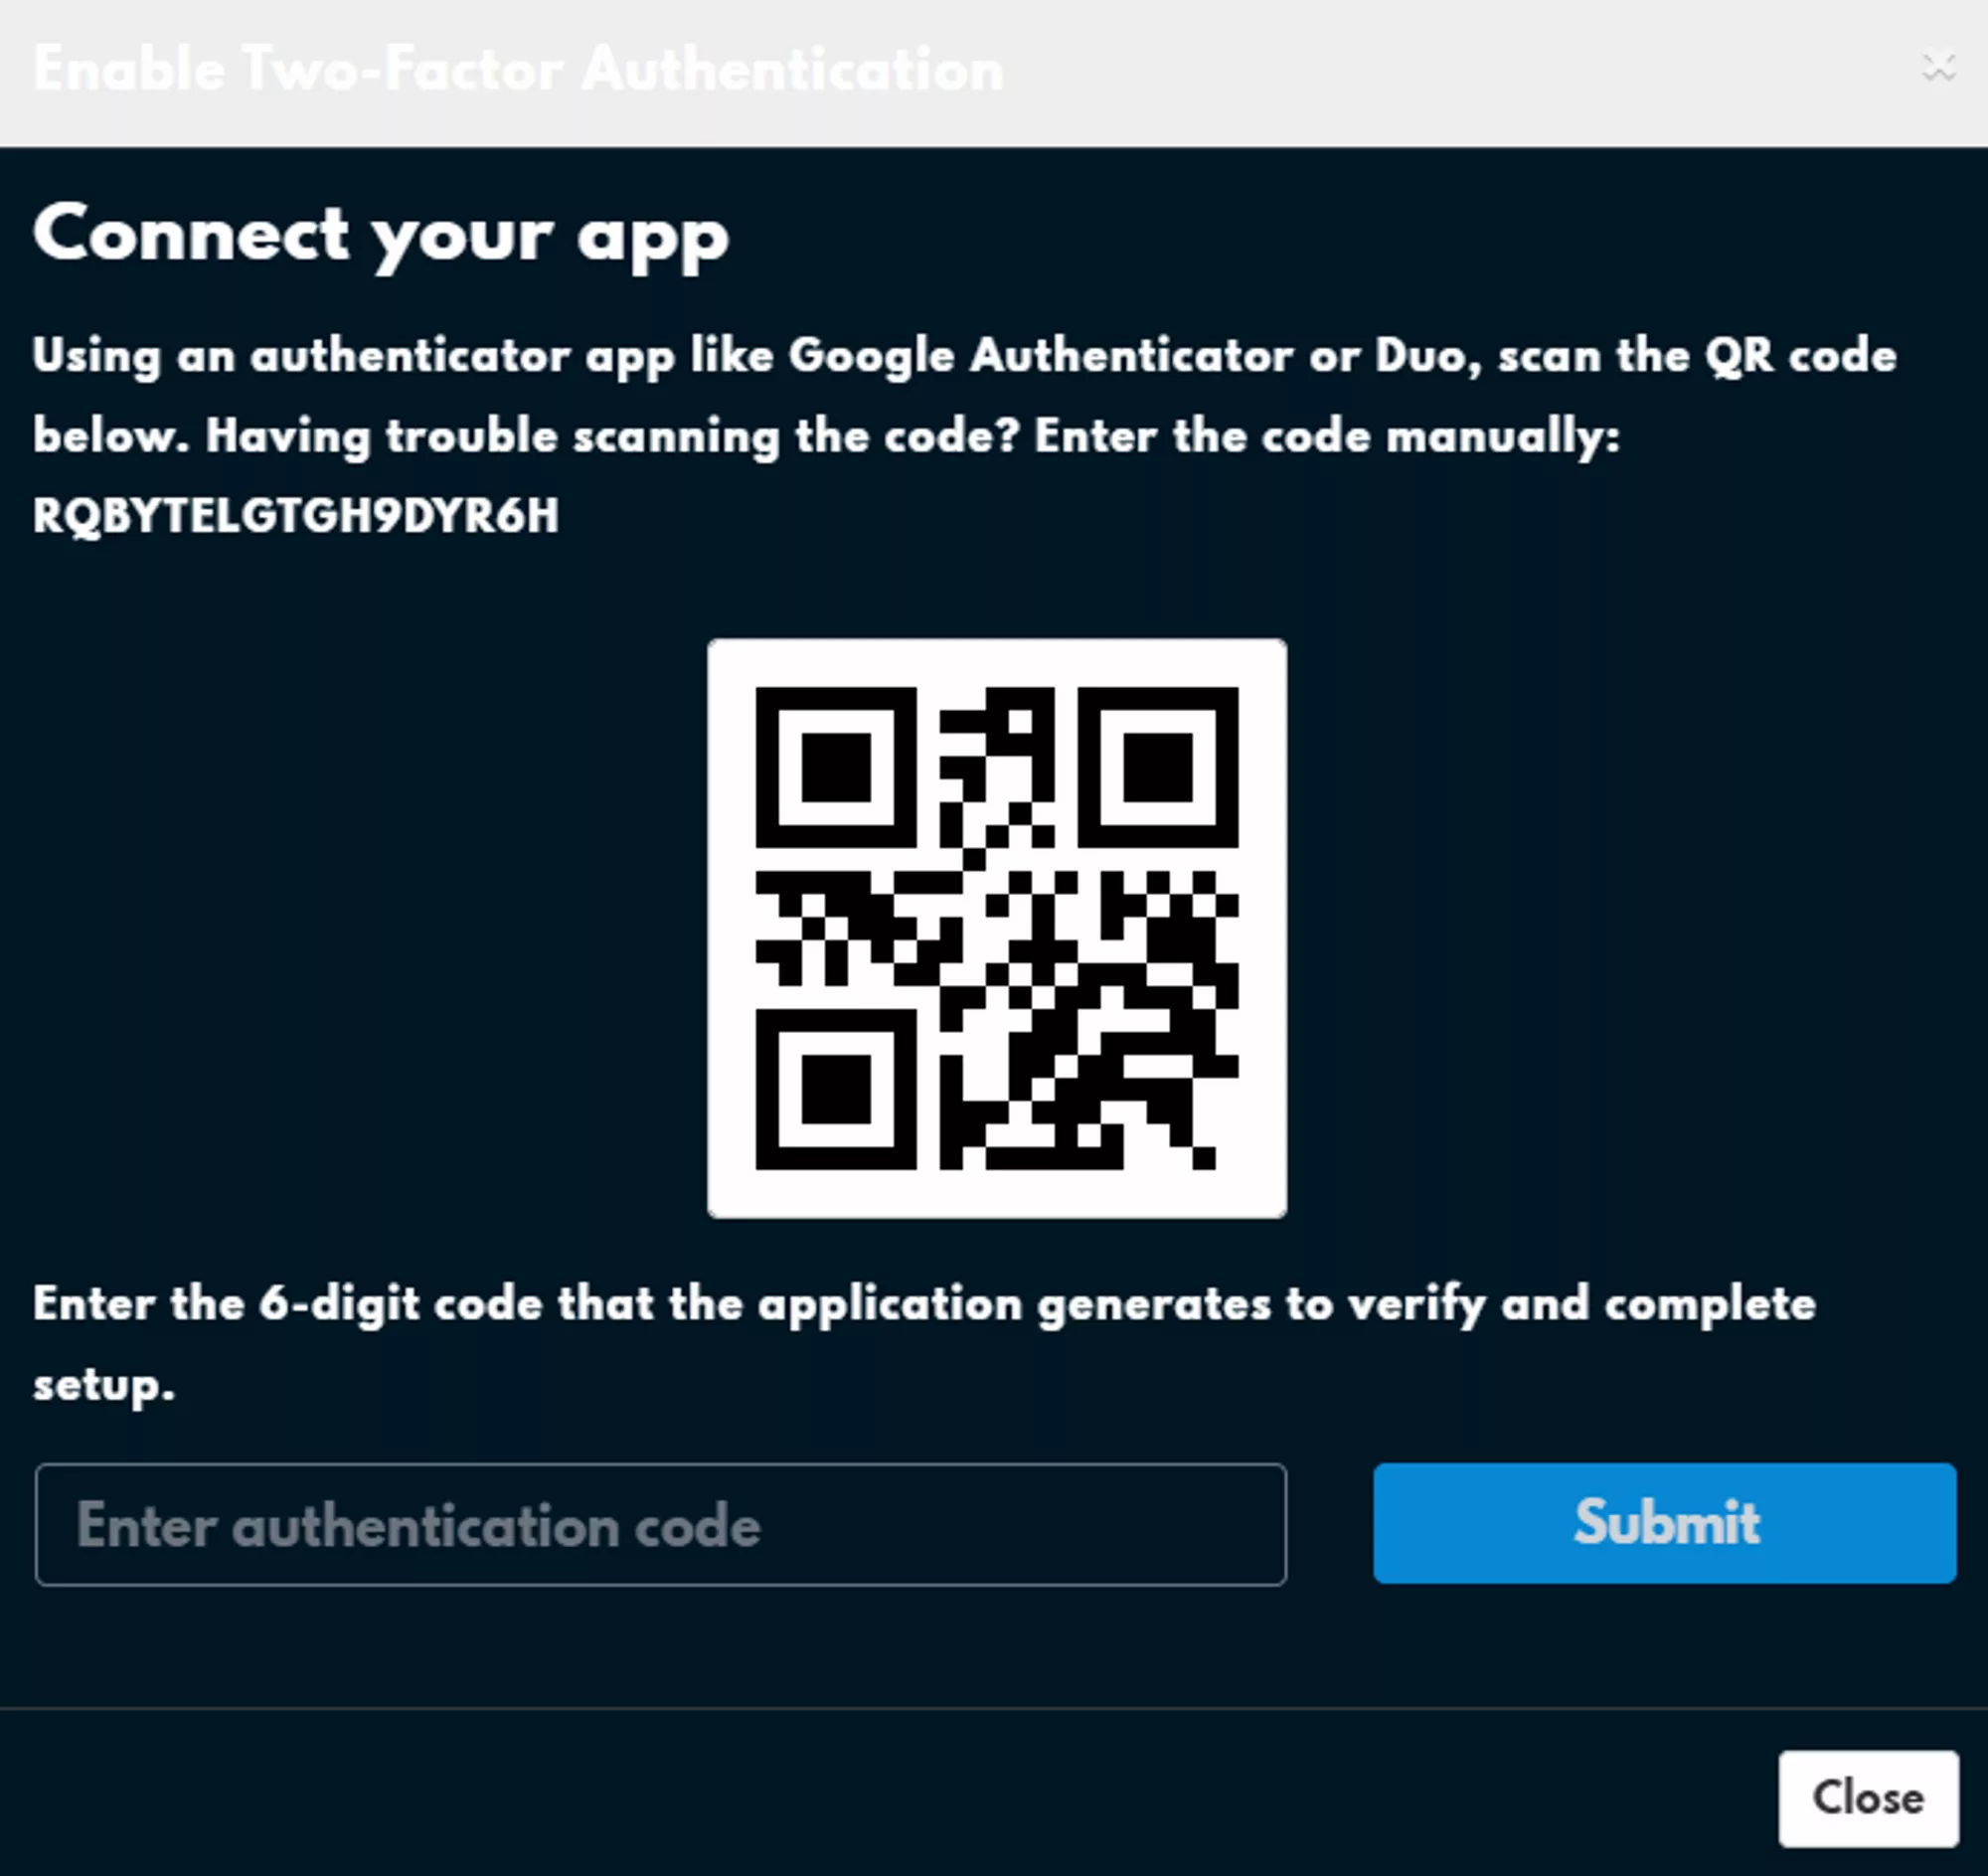
You should now see a page titled Connect your app with a QR code in the center and a long alphanumeric code above it, like the one shown in the image to the right. You can scan the QR code using an app like Google Authenticator or Authy or you can enter the code manually into either of the two apps.
Make sure to save the alphanumeric code or QR code somewhere in a secure format. Good ways are in a private password manager or encrypted flash drive!
 Loading...
There are a lot of Authenticator apps with many different features, so you might want to try a few out or look at what’s provided by your phone already. If you save the code above then you’ll have no problem switching Authenticator apps!
Billing Contacts
What is a Billing Contact
Contacts provide a way for you to add additional contact details to your Billing Account and select preferences for what those details should be used for. These details can be additional emails that need copies of your invoices, a personal email where you’d like to be notified of your support tickets, or an entirely separate contact where you’d like to receive all communication about your account.
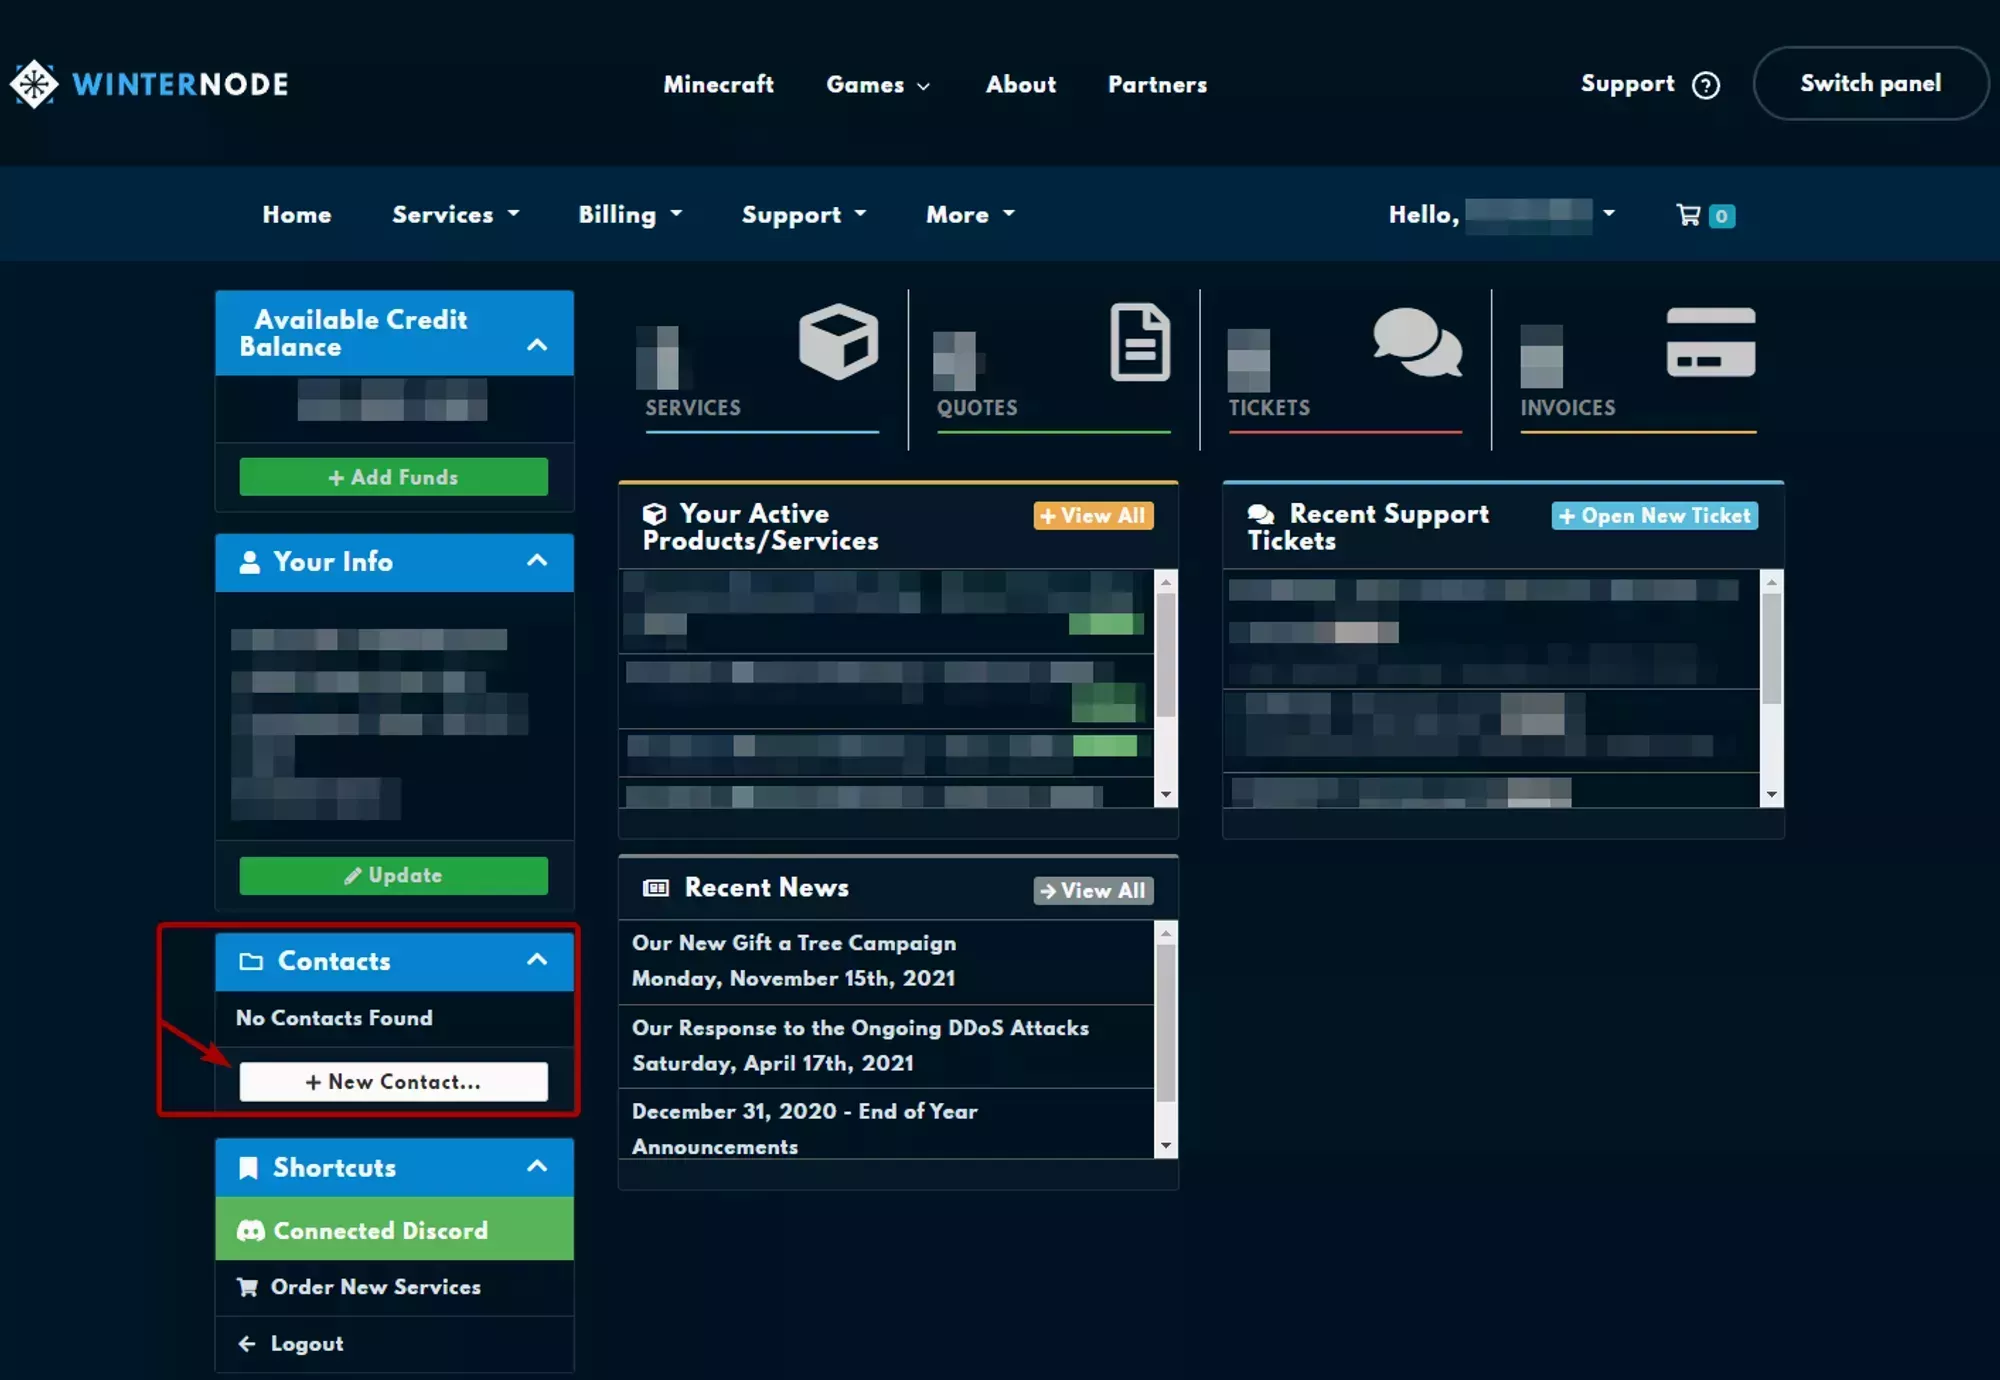
Locating the Contacts Page
The contacts page can be accessed by selecting Add New Contact from the Contacts box on the left side of the Client Area home page, as shown in the image to the right.
This is where you add new, or manage existing Contacts to your Billing Account.
 Loading...
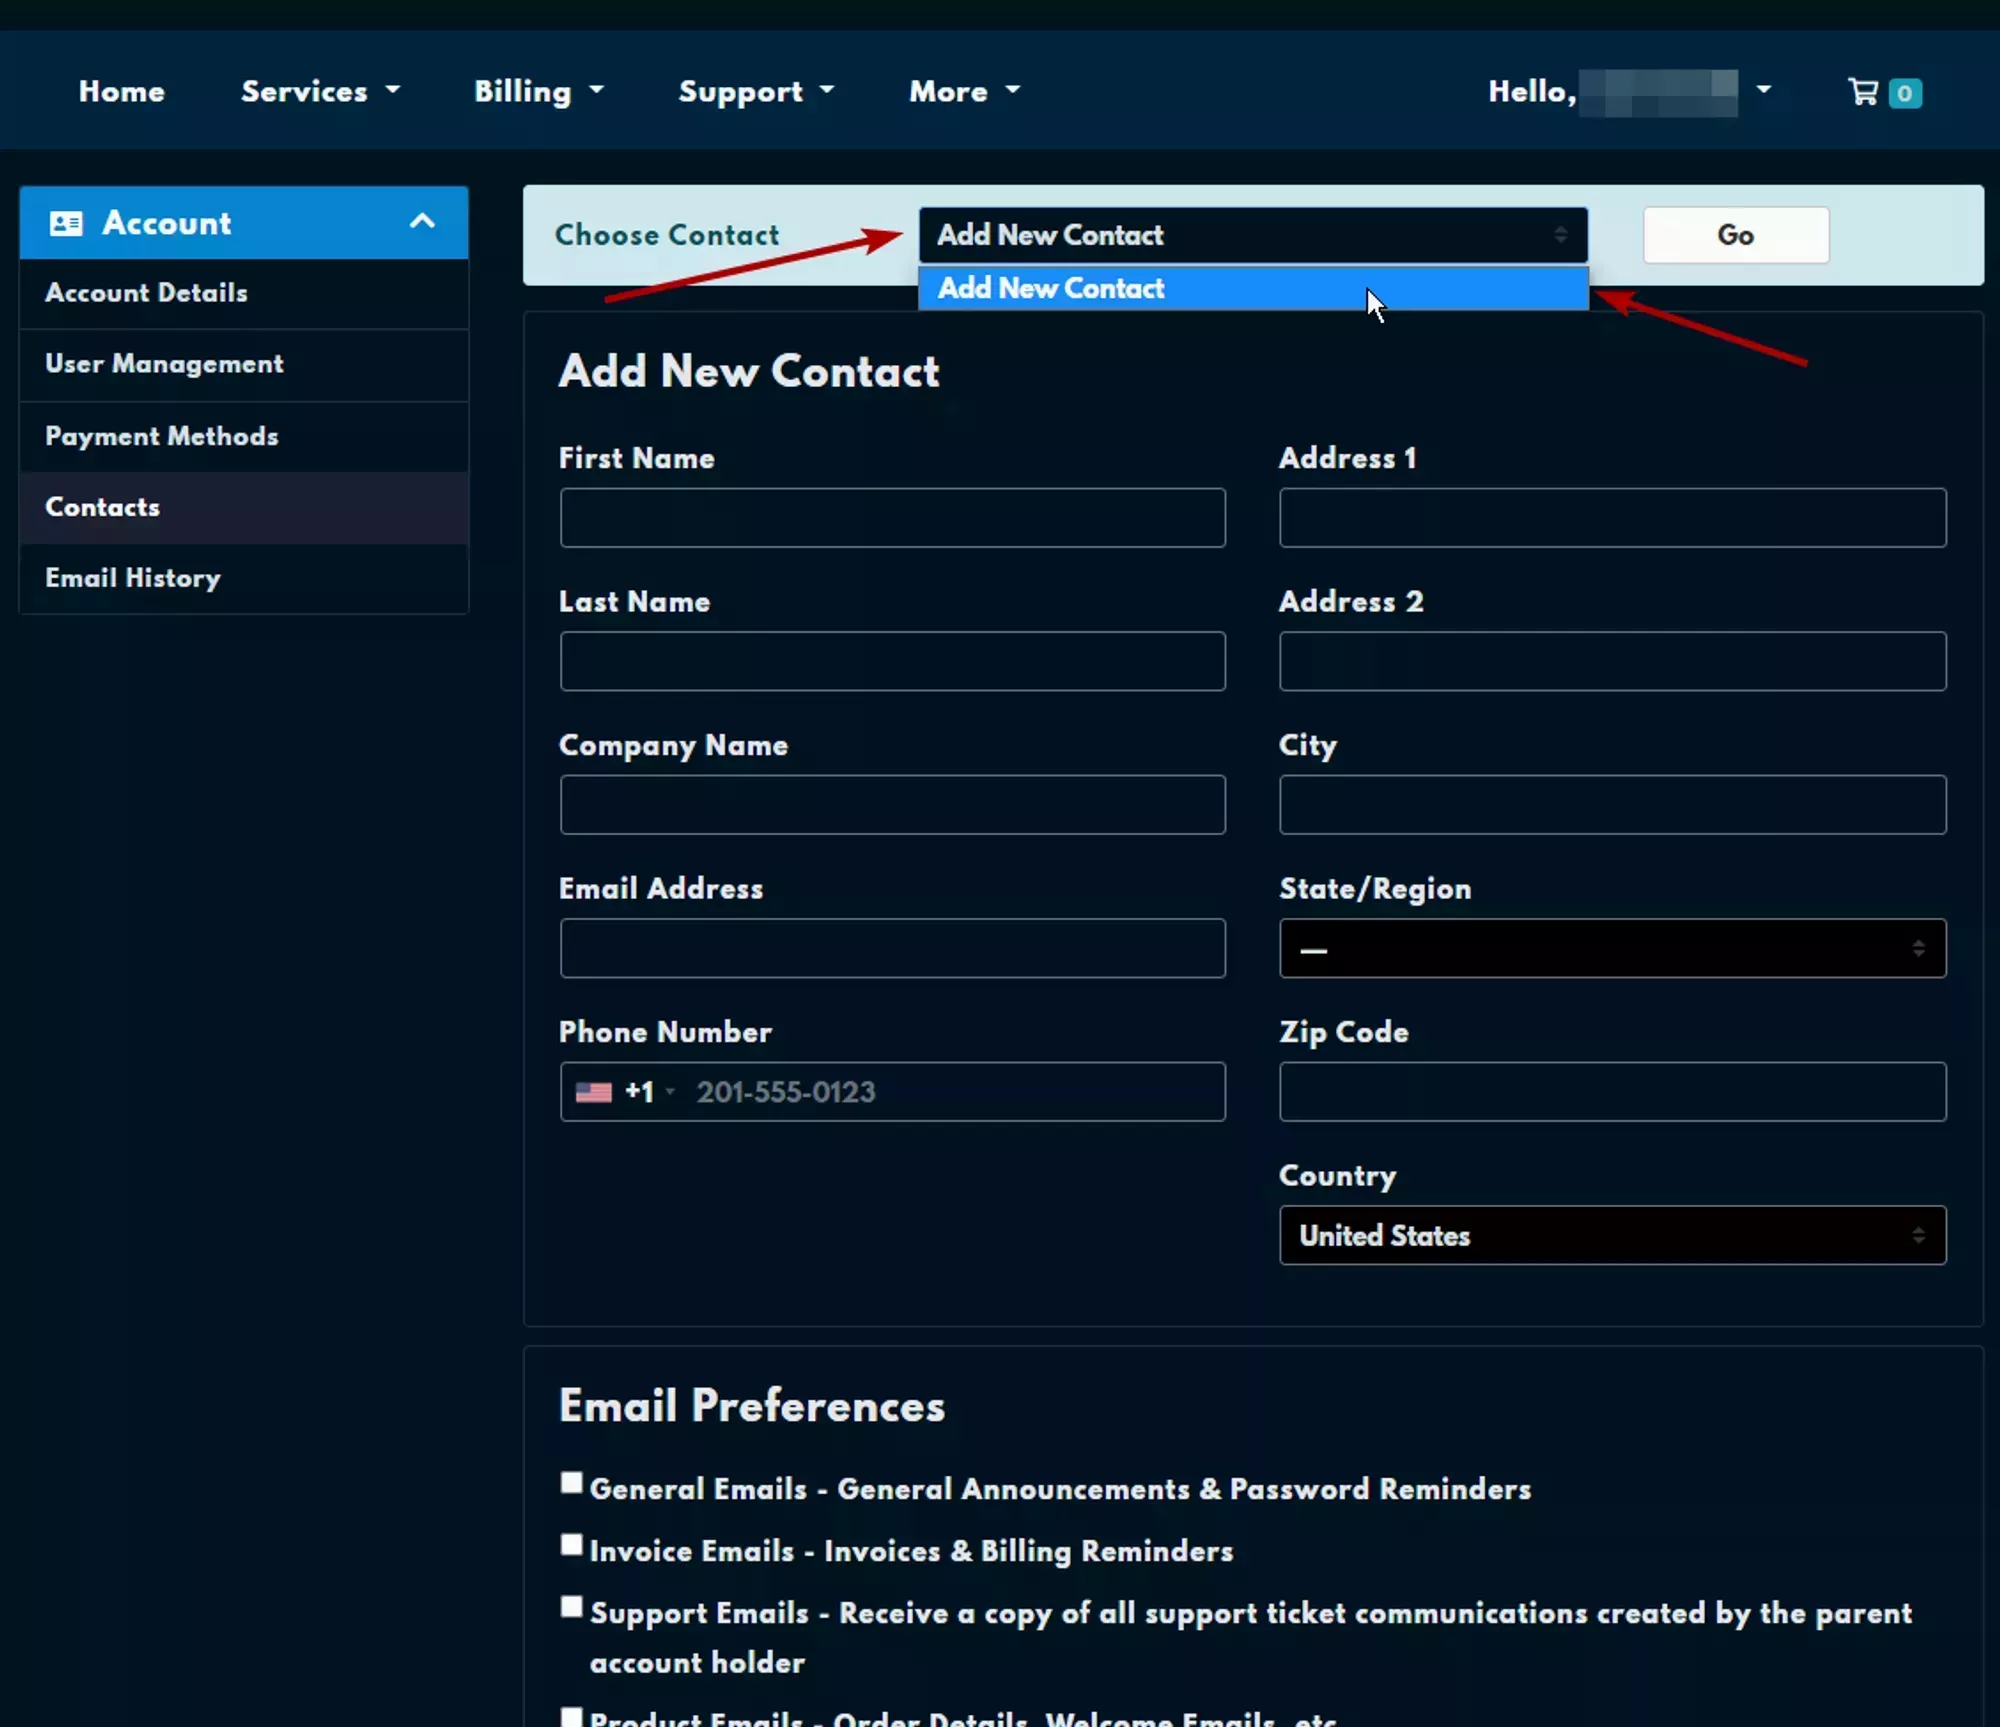
Adding a new Billing Contact
After navigating to the Contacts page make sure that the Choose Contact drop-down at the top of the page is set to New Contact and you’ll see that the detail fields are now empty. Every field is required except for Company Name and Address 2. While this is less than ideal for most use cases, it’s a limitation of the current system.
 Loading...
At this stage you can set the email preferences as well. Below the contact information you’ll find a list of email categories we’re likely to send to the address you’ve provided. You can select or deselect any of them.
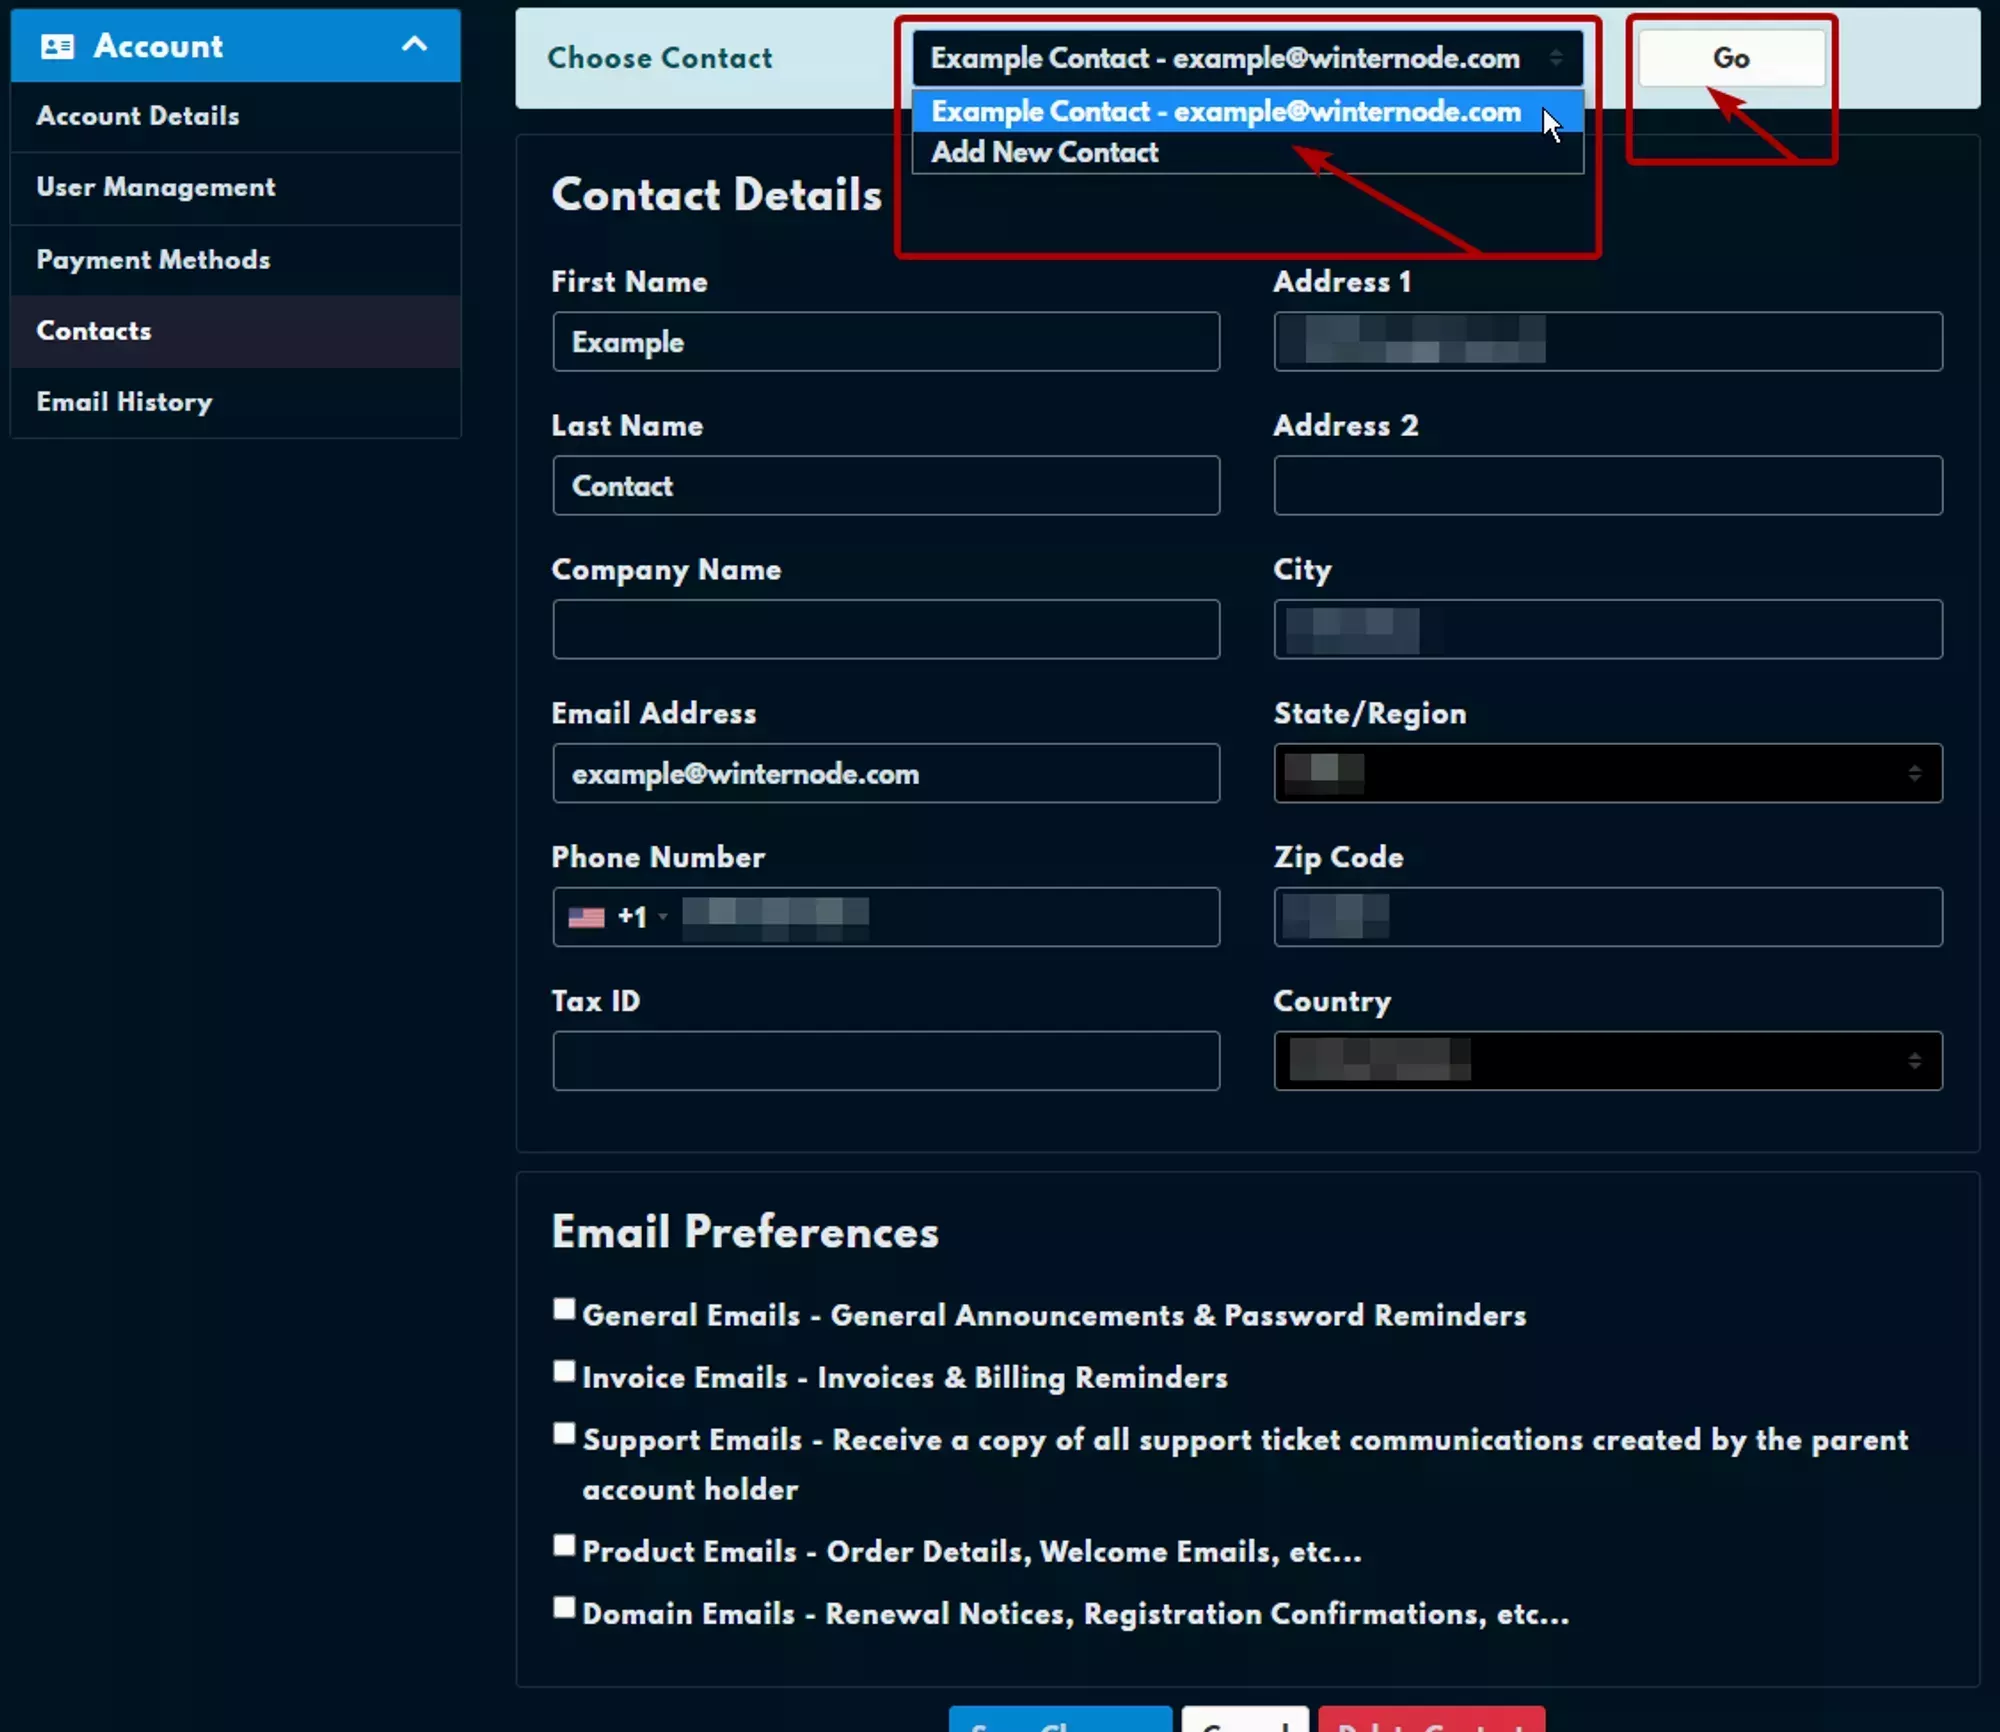
Removing an Existing Billing Contact
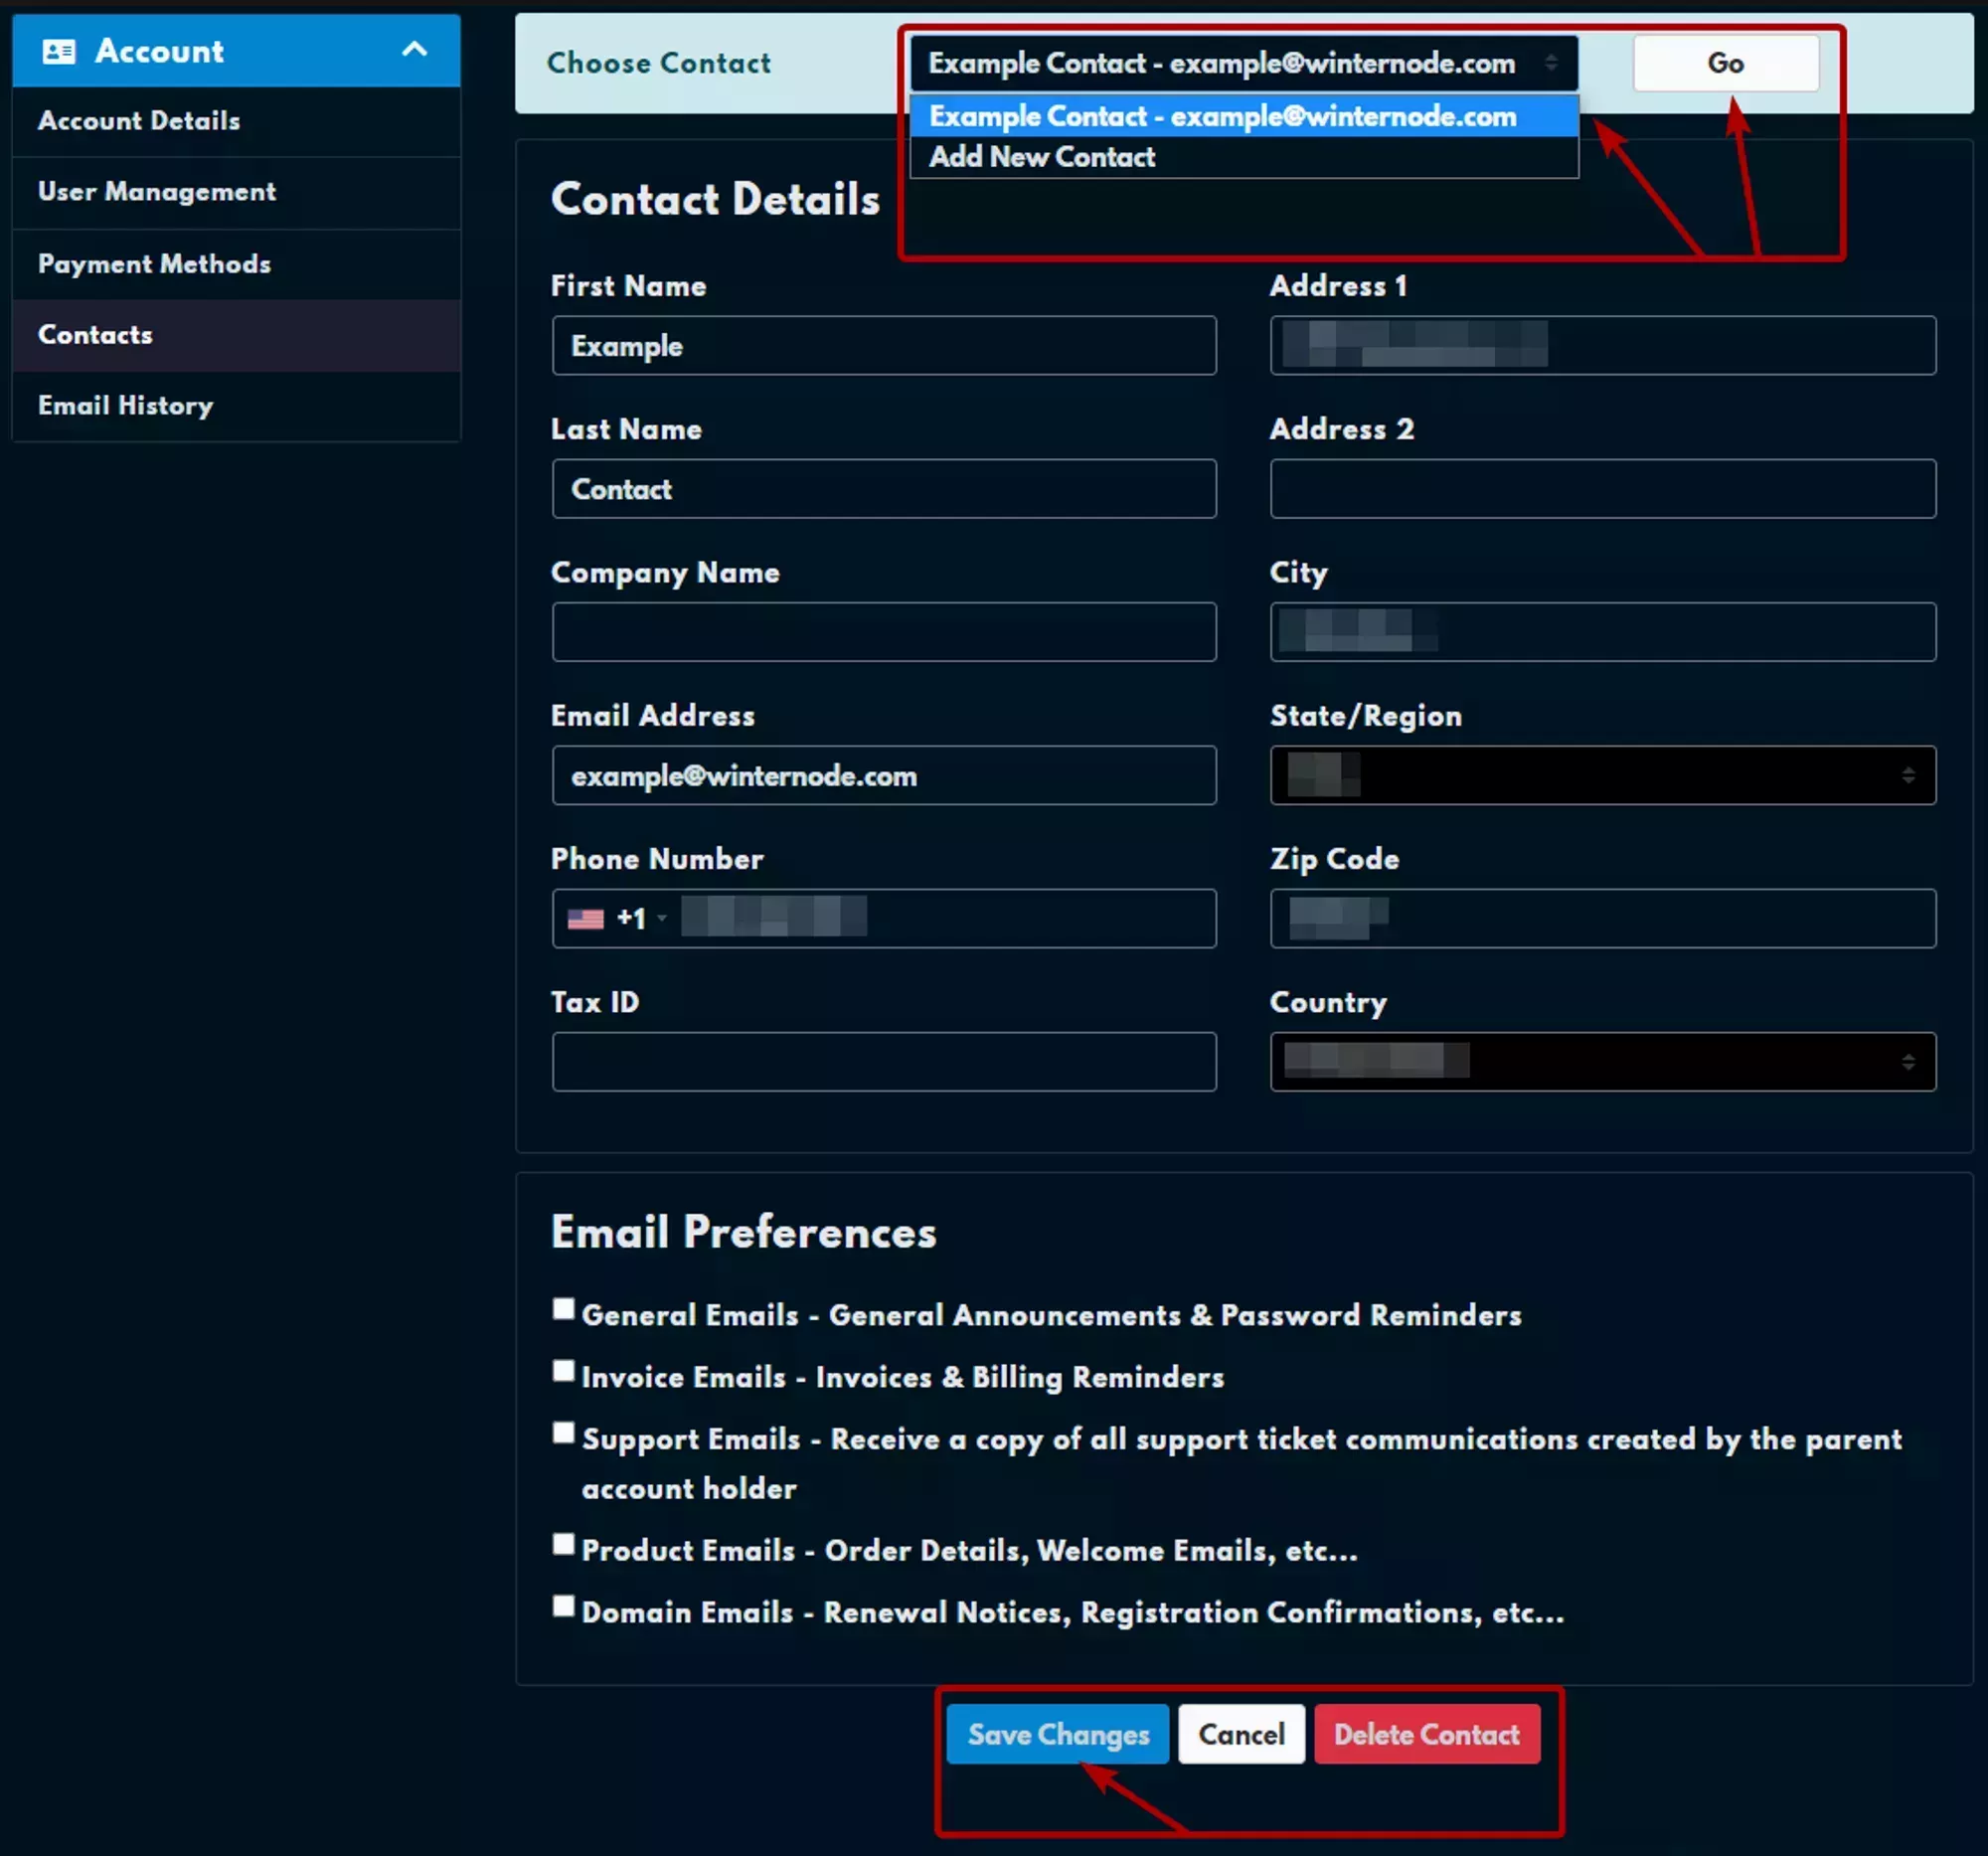
If you need to remove an existing Billing Contact, ![]() navigate to the Contacts page and select the contact you want to remove from the drop-down at the top of the page, as shown in the image to the right, and then click then
navigate to the Contacts page and select the contact you want to remove from the drop-down at the top of the page, as shown in the image to the right, and then click then Go button to the right of the dropdown.
 Loading...
This will permanently delete all contact details and contact preferences associated with this contact!
After selecting your contact, scroll down to the bottom of the page and click the Delete Contact button, shown in the image to the right, and click Confirm in the confirmation popup.
 Loading...
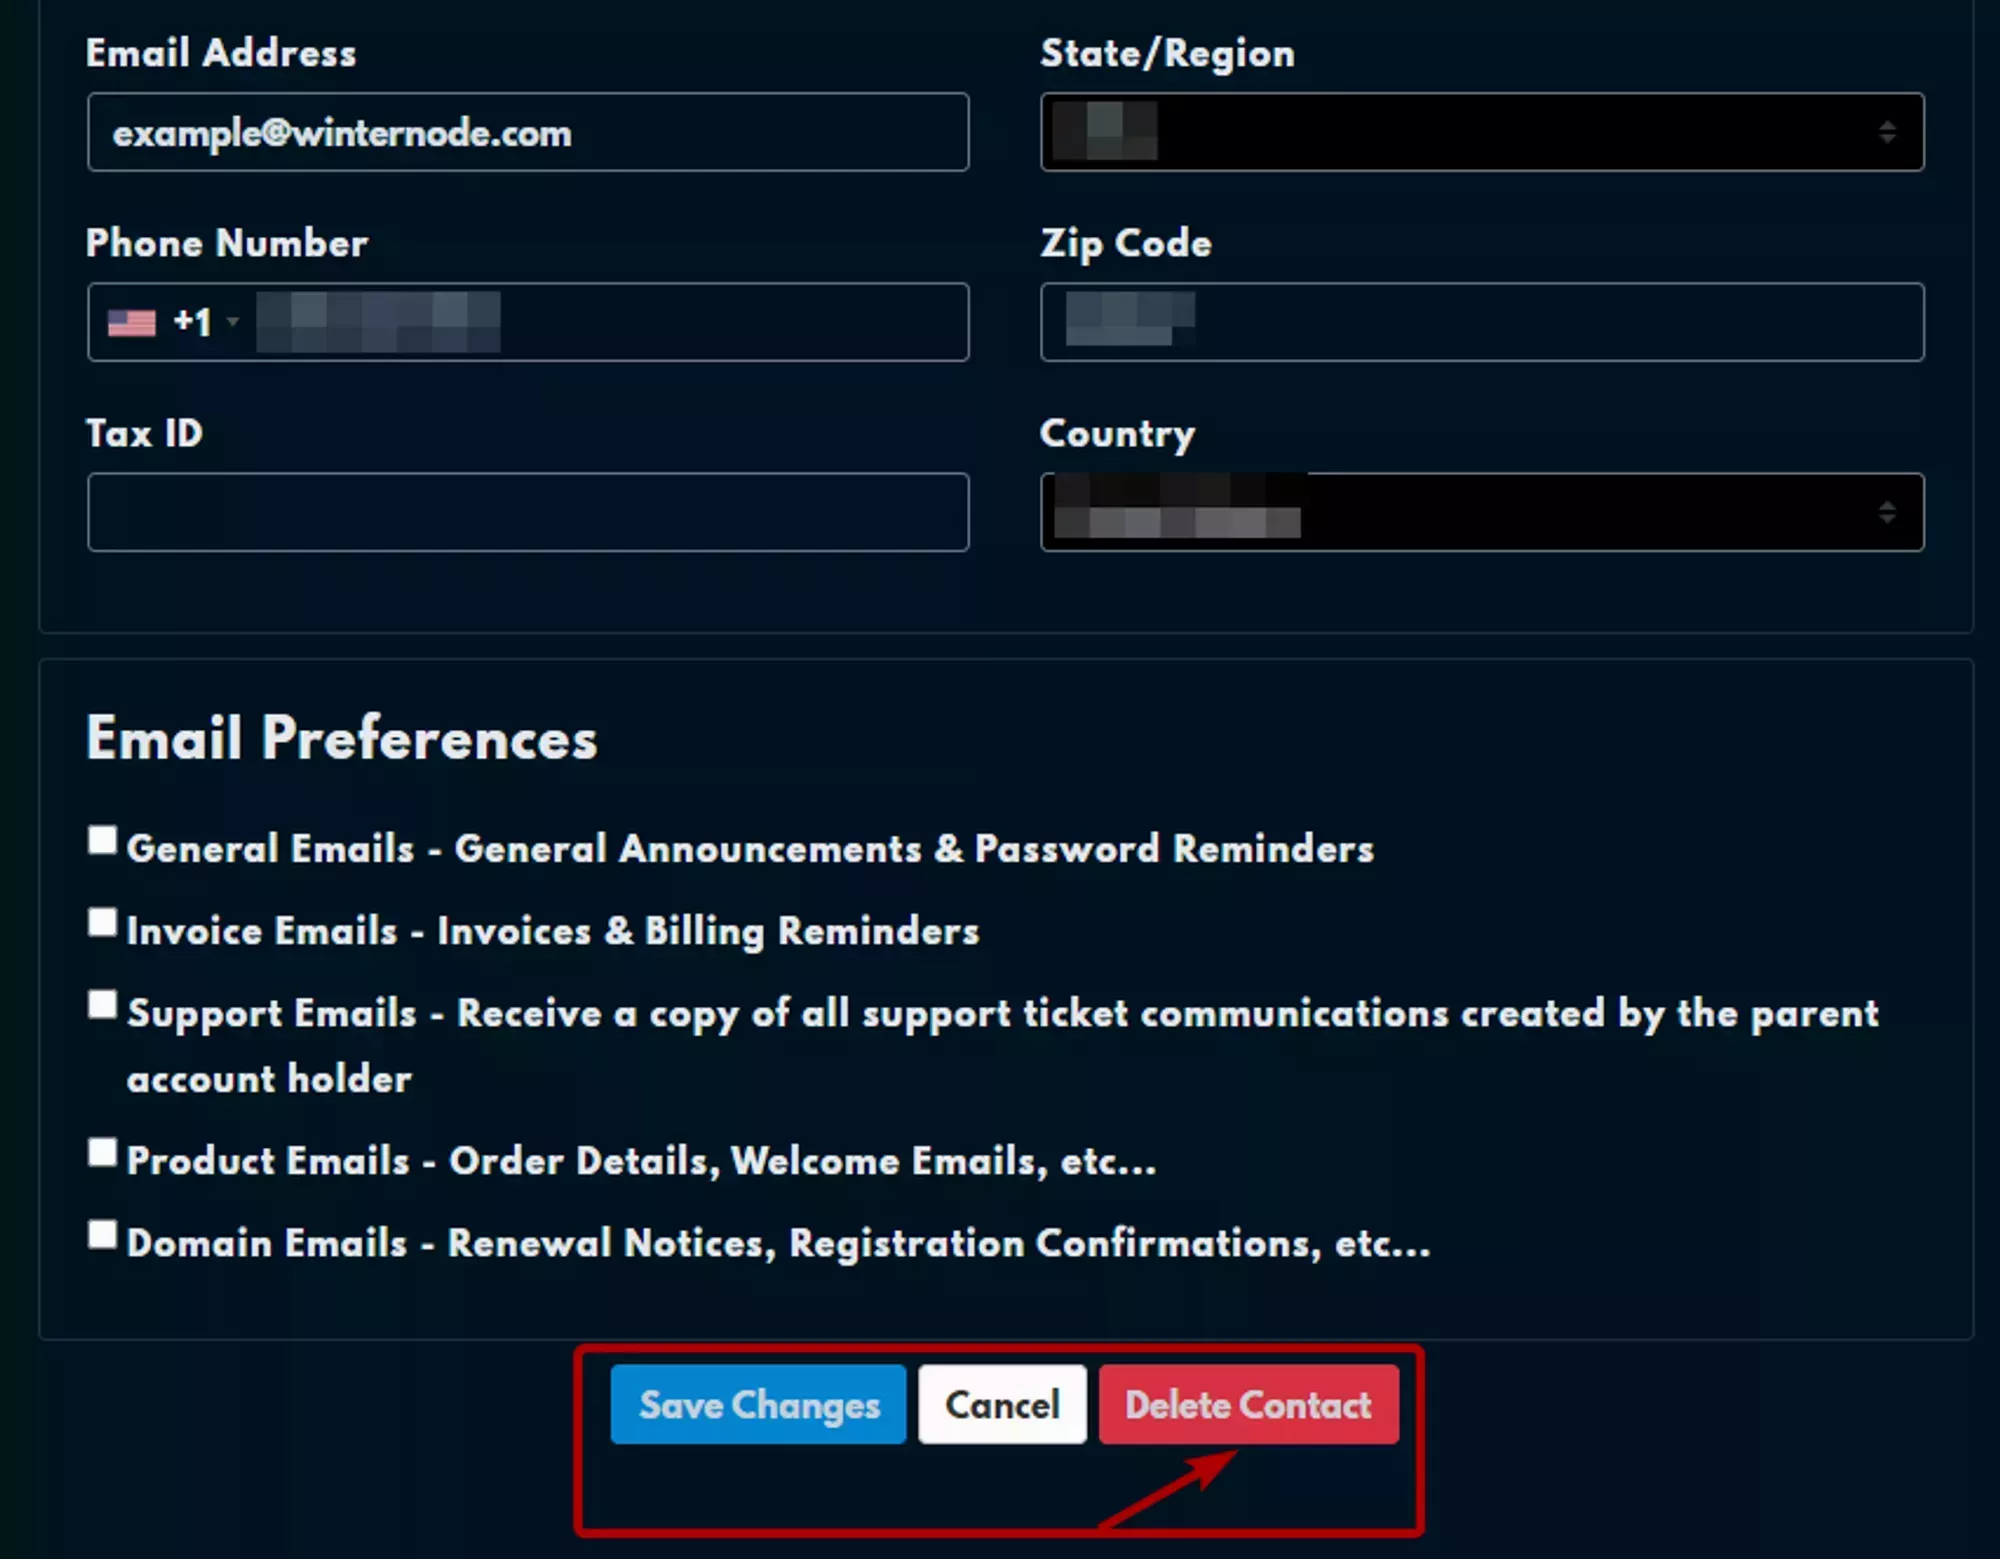
Modifying an Existing Contact
You can modify an existing contact by navigating to the contacts page, selecting the contact you want to modify from the Choose Contact drop-down at the top of the page, shown at the top of the image to the right, and changing the Contact Details or Email Preferences. After you’re done, you can click the Save Changes button at the bottom of the page, also shown in the image on the right.
Once the new information is validated and saved, the page will be refreshed and you’ll see a green box telling you that the
 Loading...
 Loading...