Spigot & Vanilla World Formats
Worlds made with Spigot have a different folder structure to those made with vanilla, even though the actual data within the folders is the same. If you want to use your Vanilla world on a Spigot based server, or if you want to move a Spigot world to a Vanilla/Fabric Server or Single player game, then you'll have to move the folders a bit to get the game to recognize the files for what they are.
Vanilla to Spigot
This will delete the world on your Spigot server. Make sure that anything you want to keep is backed up!
Get the seed of your Vanilla world
Lucky for us, Spigot does most of the work of restructuring the world. There are a few things we have to ourselves though. To start with we need to get the seed of your Vanilla world. If you don't know what it is then you'll need to load the world in either single-player or multi-player and run the /seed command and save the output.
Make sure you backup your world! While this task is relatively low risk it's always important to work on a backup to prevent accidental data loss!
Rename your world folder
Now you need to rename the backup of your world file to either world or another name without spaces. If you want to choose another name you can substitute spaces with _ or -.
Stop your server and delete the default spigot world stored in world, world_nether, and world_the_end
The next step is to work on the Spigot side of things. Start by stopping your server and navigating to the file manager.
We need to delete the default world generated by spigot. It's stored in 3 separate folders named world, world_nether, and world_the_end. Spigot will regenerate these files with the contents of your Vanilla world
Add your seed to server.properties using the level-seed property
This is where we need the seed you obtained earlier. Navigate to the server.properties file and change the contents of level-seed to your seed. This will make sure that newly generated chunks will match your current world.
Change the level-name=world property in server.properties to your world name (if needed)
You only need to do this step if you chose a folder name other than world, but if you did then you need to change the level-name=world property in server.properties to your the name that you chose.
Compress and upload your world over SFTP
Now you need to compress your world folder, not it's contents, and upload it to your server over SFTP. Make sure to upload the compressed file to the root of your server. The root is where you'll find files like server.jar and server.properties.
If you aren't sure how to use SFTP then head over here to our ![]() Using SFTP page.
Using SFTP page.
Decompress the world and start the server
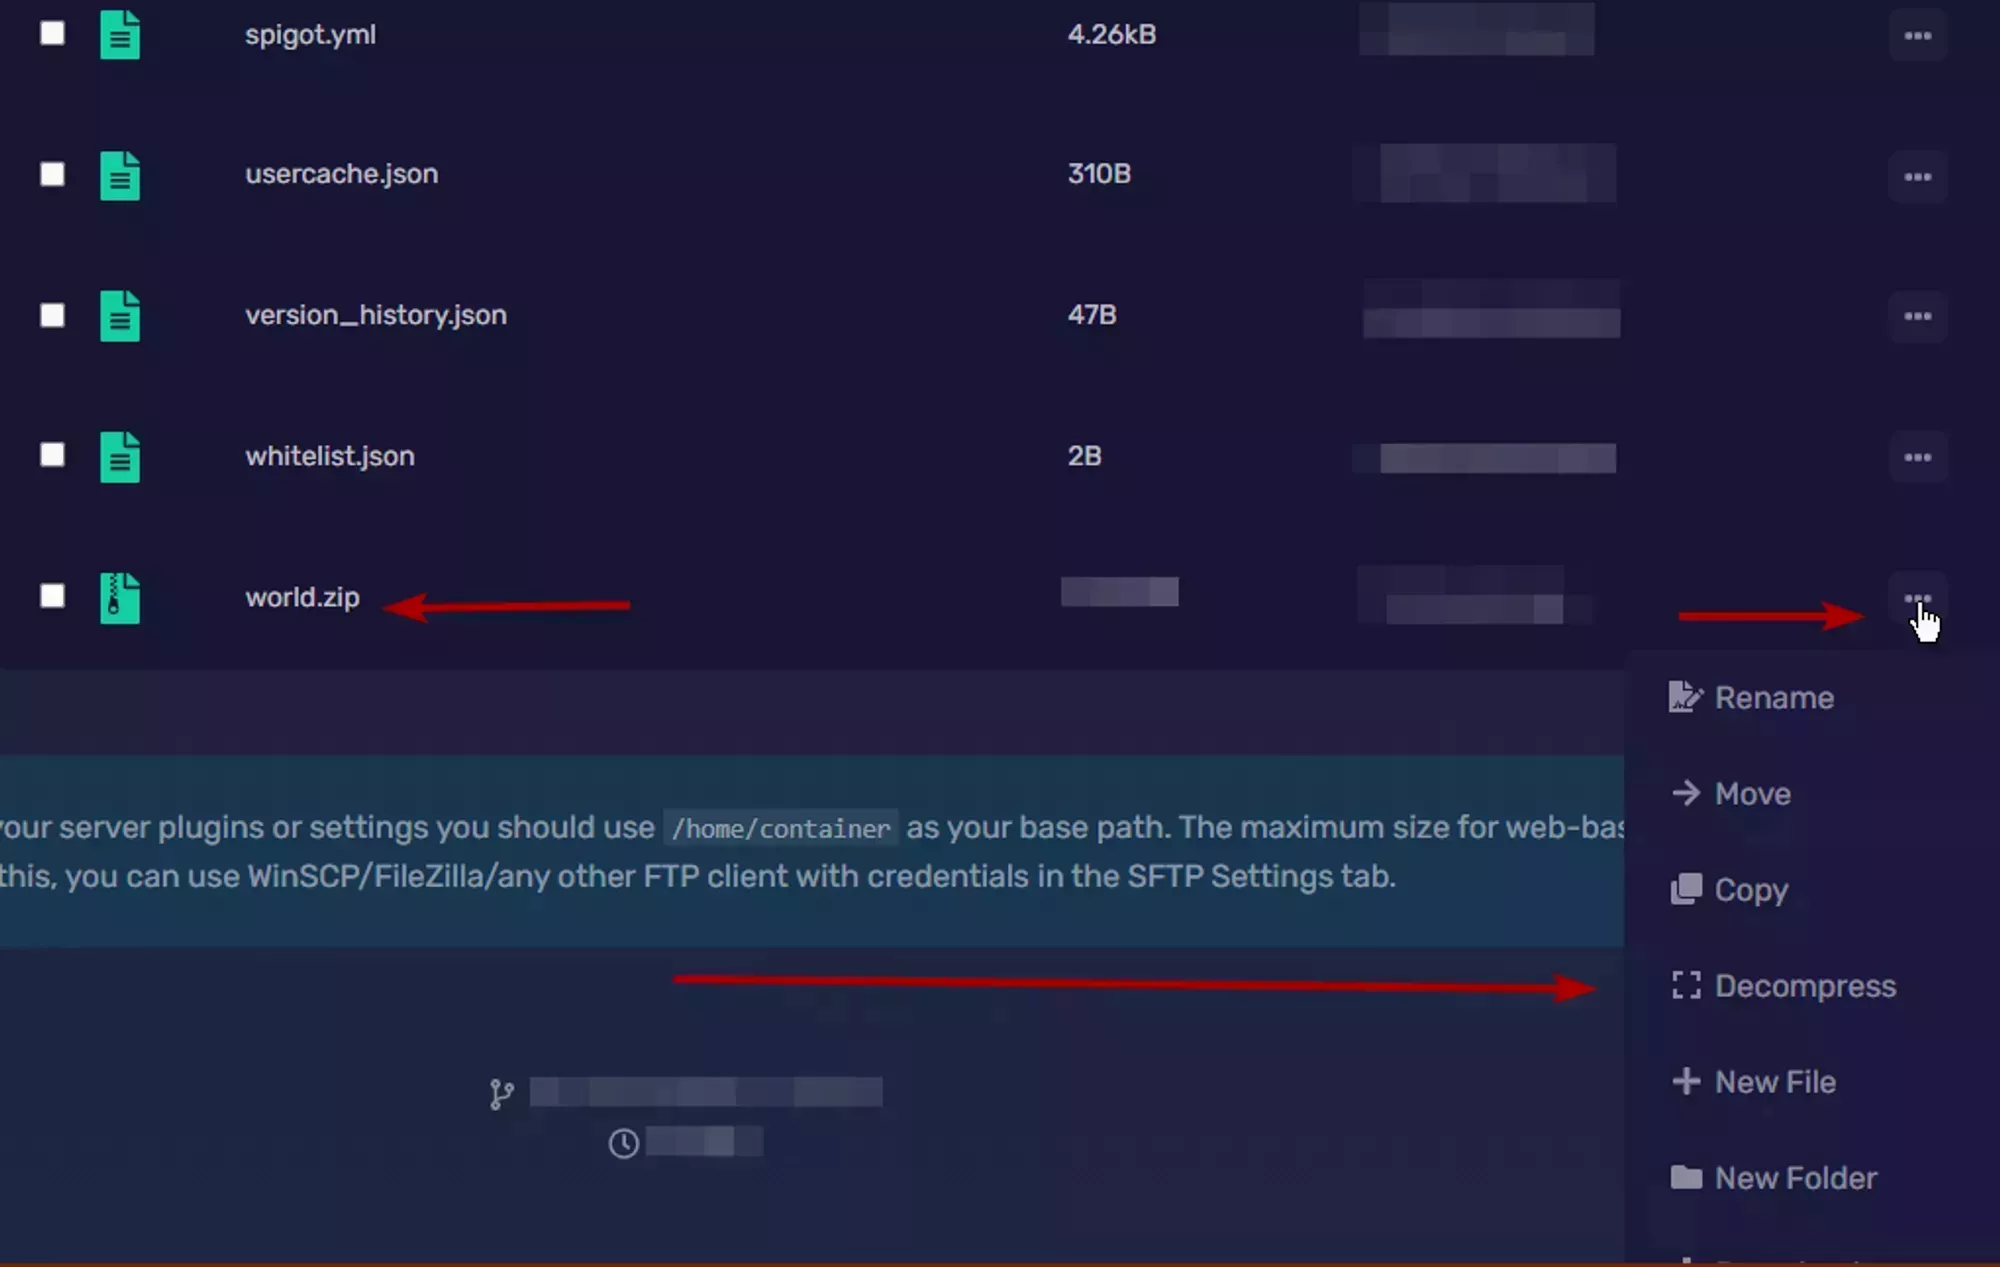
The final step is to decompress your world file. Just select the 3 dots on the right of the compressed file and select decompress. Check the image on the right for an example of how that looks. Wait for the decompression to complete and then start your server.
 Loading...
While your server is starting you should watch the logs. You'll see these two lines in it followed by the status of the migration.
---- Migration of old nether folder required ----
---- Migration of old the_end folder required ----
If you see those two lines then everything went as planned and your world has been migrated!
Congratulations!
If you don't see those, or if there's an error after them then something has gone wrong during the process. If you aren't sure what you missed, feel free to reach out to us through our support channels and we'll be more than happy to help you out!
Spigot to Vanilla
Converting a Spigot world to the Vanilla format has to be done by hand because the Vanilla game doesn't have the ability to recognize the Spigot format. Luckily, it's a relatively simple process.
Download your world over SFTP
If you aren't sure how to use SFTP then head over here to our ![]() Using SFTP page.
Using SFTP page.
The first thing you'll need to do is download the three spigot worlds over SFTP. By default they'll be named world, world_nether, and world_the_end. If you set a custom name for your world in server.properties then the word world will be replaced with the name you set.
It's recommended that you compress your world folders before you download them because SFTP doesn't handle transferring small files very well. To compress the world folders just press the options button on the right of each folder, and select archive. The archive is what you'll download. For and example of what that looks like, see the image on the right.
Loading...
After you've downloaded the compressed world folders, make sure you decompress them and move them all to the same location.
Move the world_the_end/DIM1 and world_nether/DIM-1 folders to the world folder
The individual world folders that you just downloaded are just the separate dimensions that are included in the vanilla game. Each folder has the parts it needs to be it's own vanilla save file, but only the terrain information for one dimension. So all we need to do is move the terrain information to one of those folders, specifically the folder for the overworld.
We'll start by moving the nether dimension over. Make sure that you know where the 3 folders you downloaded are and that you can move files between them. Now locate the world_nether/DIM-1 folder and move it to world/DIM-1. Next, do the same to the end byworld_the_end/DIM1 to world/DIM1.
That's everything! Now when you move the world folder to a Vanilla/Fabric/Forge server, or your client's save folder it'll be able to find the dimensions in the folder just like it expects.
Once the world is uploaded you need to decompress it by using the file manager on the Game Panel. For an example of where the compressed world file should be and how to access the decompress button, see the image to the right. Wait for the file to decompress and then start your server.